
Using OVHcloud VPS as a Dedicated Backup Server
Overview
This guide configures an OVHcloud VPS to automatically back up your servers to Object Storage. The setup uses Plakar to create encrypted, deduplicated snapshots on a scheduled interval with web UI monitoring.
Architecture
- Backup VPS: Runs Plakar and schedules backups
- Source servers: OVHcloud servers to back up
- OVHcloud Object Storage: Stores encrypted backups
Plakar + Scheduler"] subgraph Storage["OVHcloud Object Storage"] Kloset["Kloset Store
Encrypted & Deduplicated
Backup"] end Server1 -->|SSH/SFTP| BackupVPS Server2 -->|SSH/SFTP| BackupVPS ServerN -->|SSH/SFTP| BackupVPS BackupVPS -->|Store Snapshots| Kloset %% Apply classes class Server1,Server2,ServerN sourceBox class BackupVPS brandBox class Kloset storeBox class space1,space2,space3,space4 invisible %% Classes definitions classDef sourceBox fill:#ffe4e6,stroke:#cad5e2,stroke-width:1px classDef brandBox fill:#524cff,color:#ffffff,stroke:#524cff,stroke-width:2px classDef storeBox fill:#dbeafe,stroke:#60a5fa,stroke-width:2px classDef invisible fill:none,stroke:none,color:transparent linkStyle default stroke:#94a3b8,stroke-width:2px,stroke-dasharray:5 5
Prerequisites
- OVHcloud account with billing configured
- SSH access to source servers
- Basic familiarity with Plakar commands
Create Object Storage
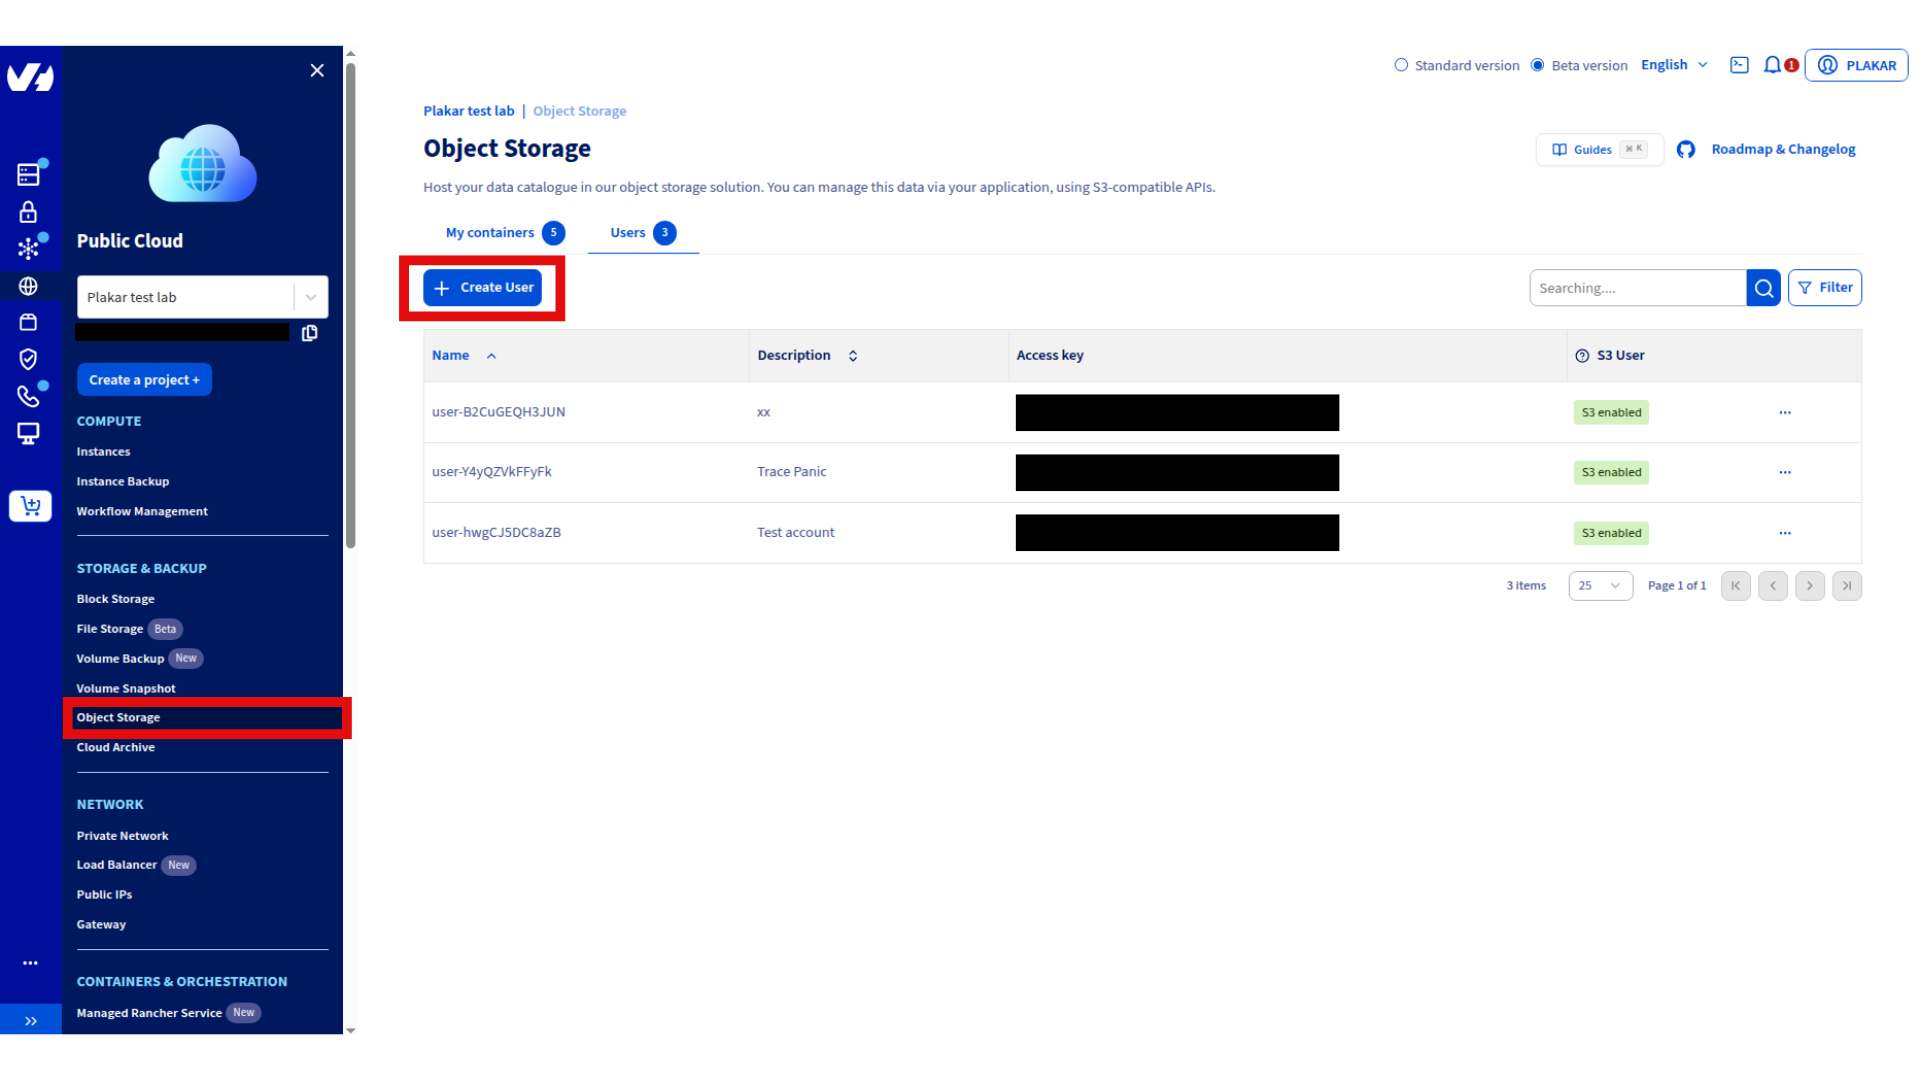
Create storage user
- Log in to OVHcloud Control Panel
- Navigate to Public Cloud → Storage & Backup → Object Storage → Users
- Click Create User
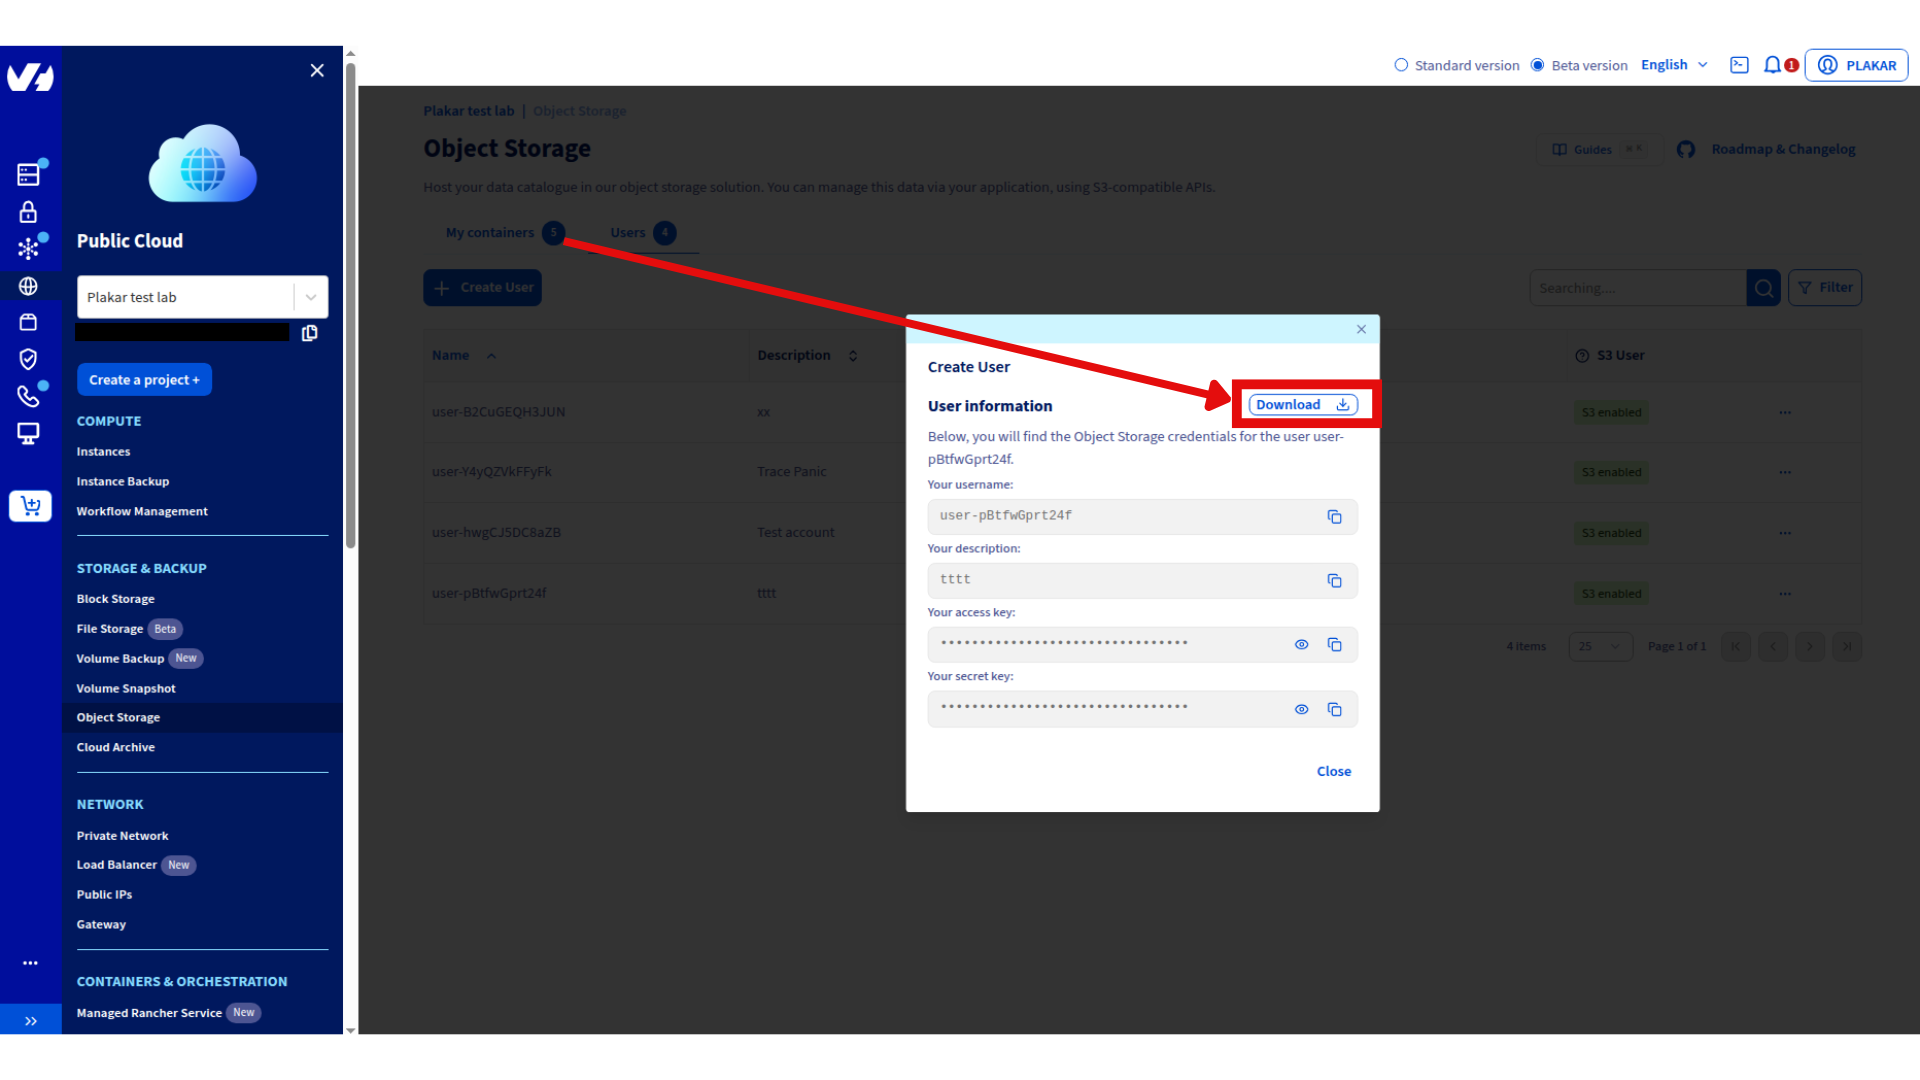
- Enter description and click Create
- Download and store credentials securely
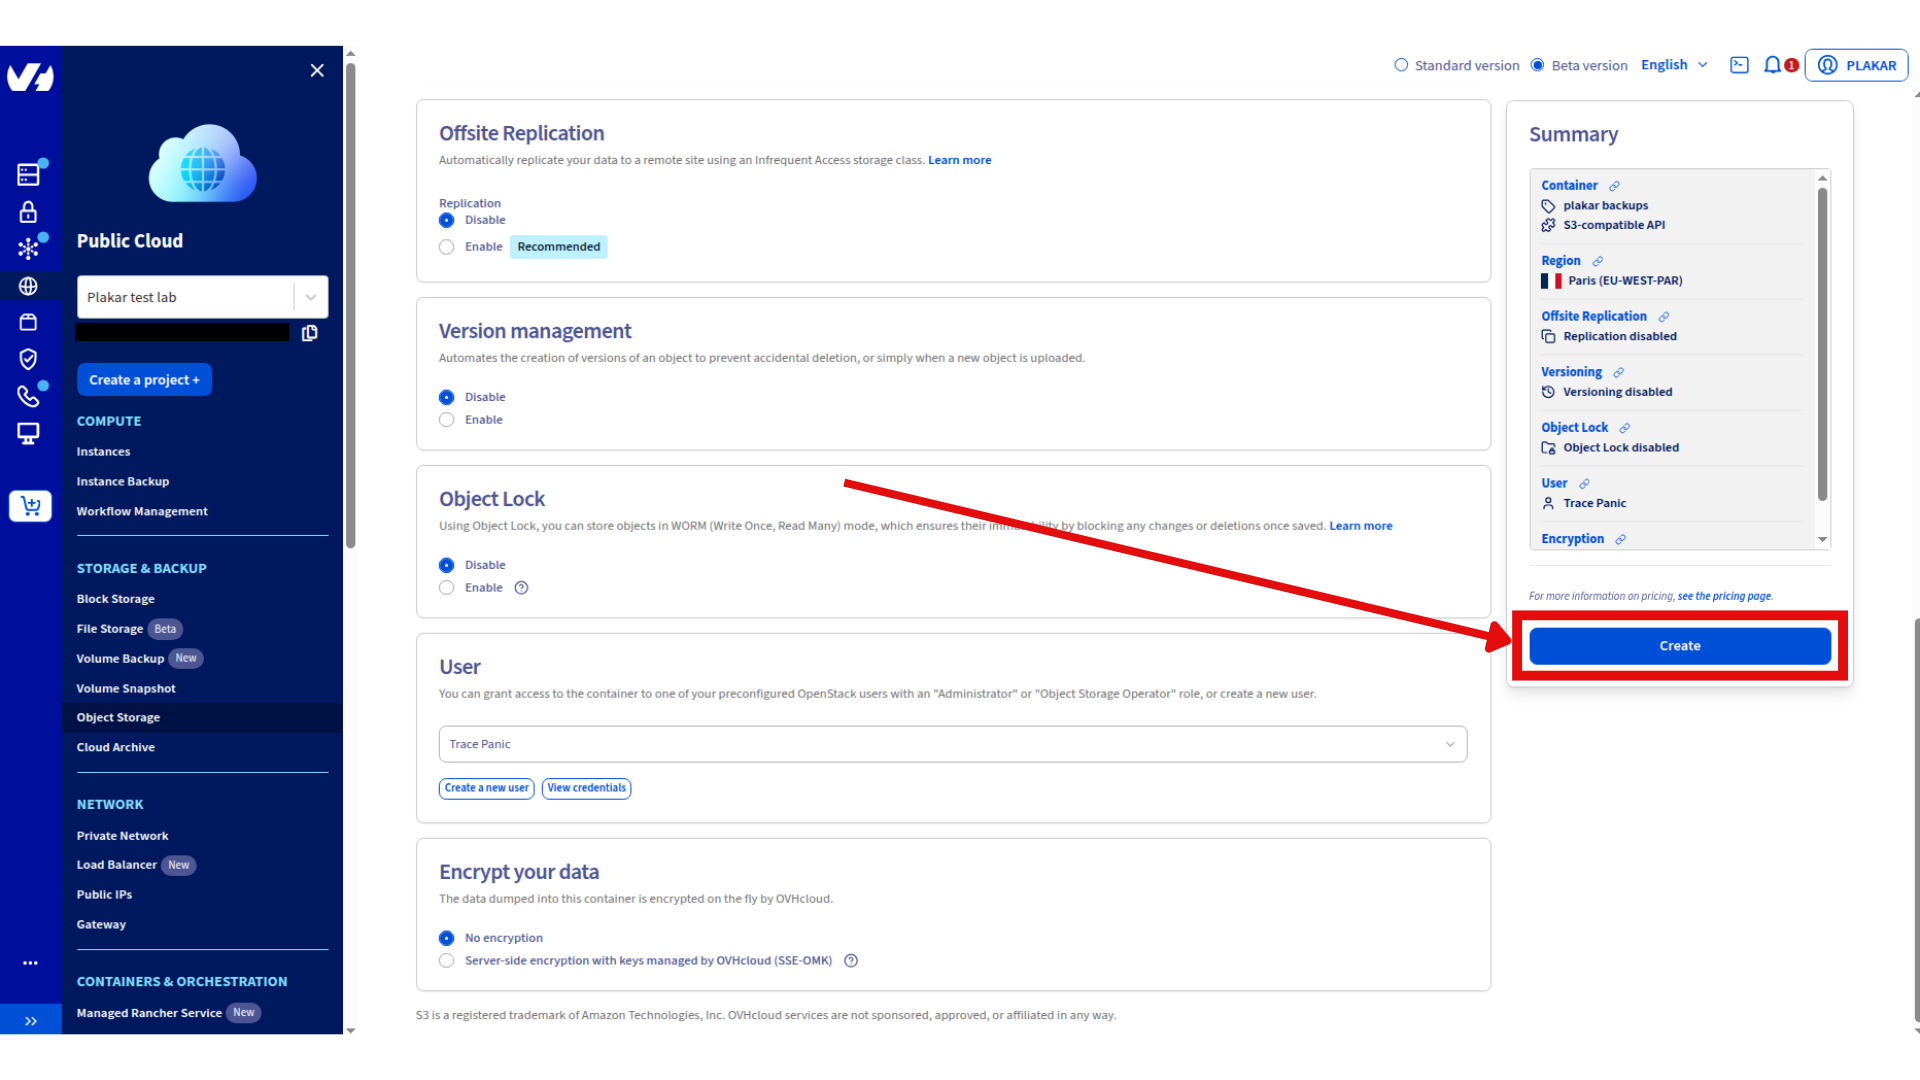
Create storage container
- Navigate to Public Cloud → Storage & Backup → Object Storage
- Click Create an Object Storage container
- Configure:
- Name:
plakar-backups - Container API: S3-compatible API
- User: Select the user created above
- Deployment: Choose 3-AZ (high availability) or 1-AZ (cost efficient)
- Region: Select location closest to your servers
- Name:
- Click Create

Reference: OVHcloud S3 Object Storage documentation
Provision Backup VPS
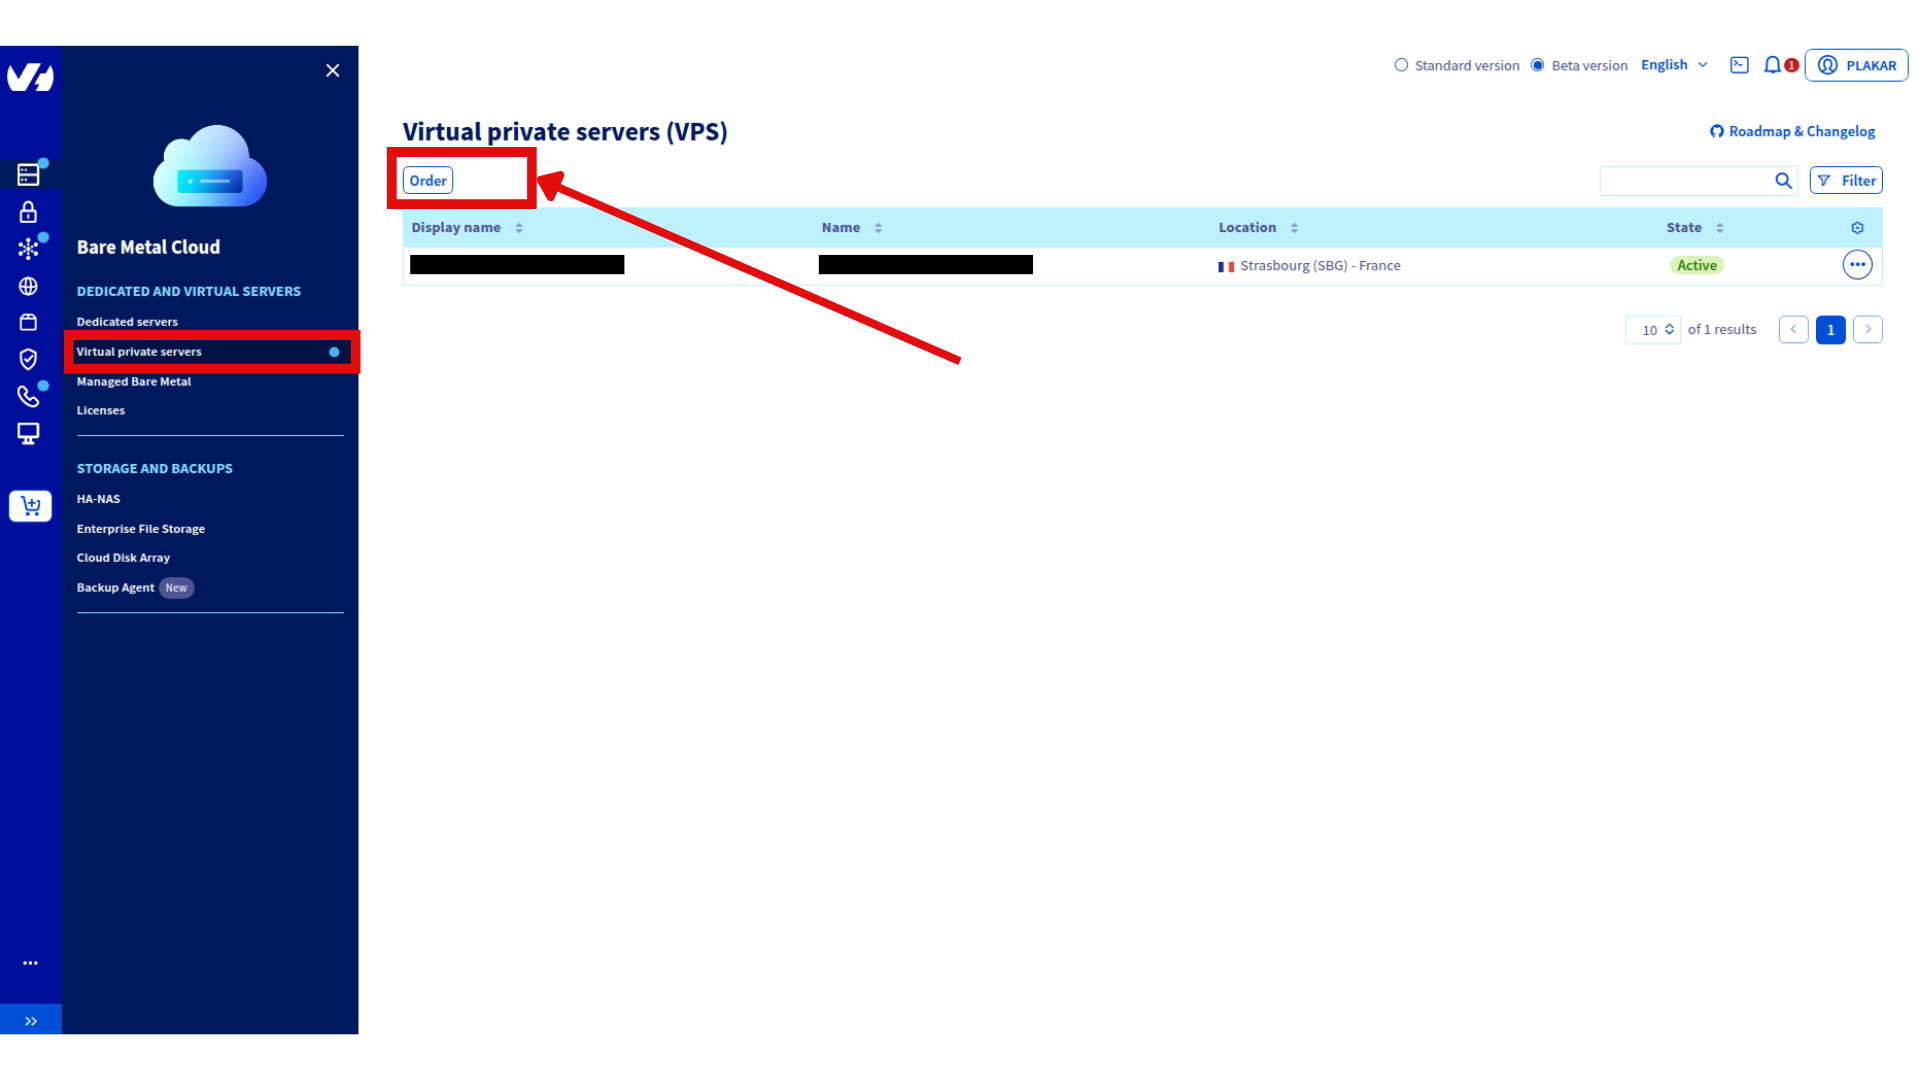
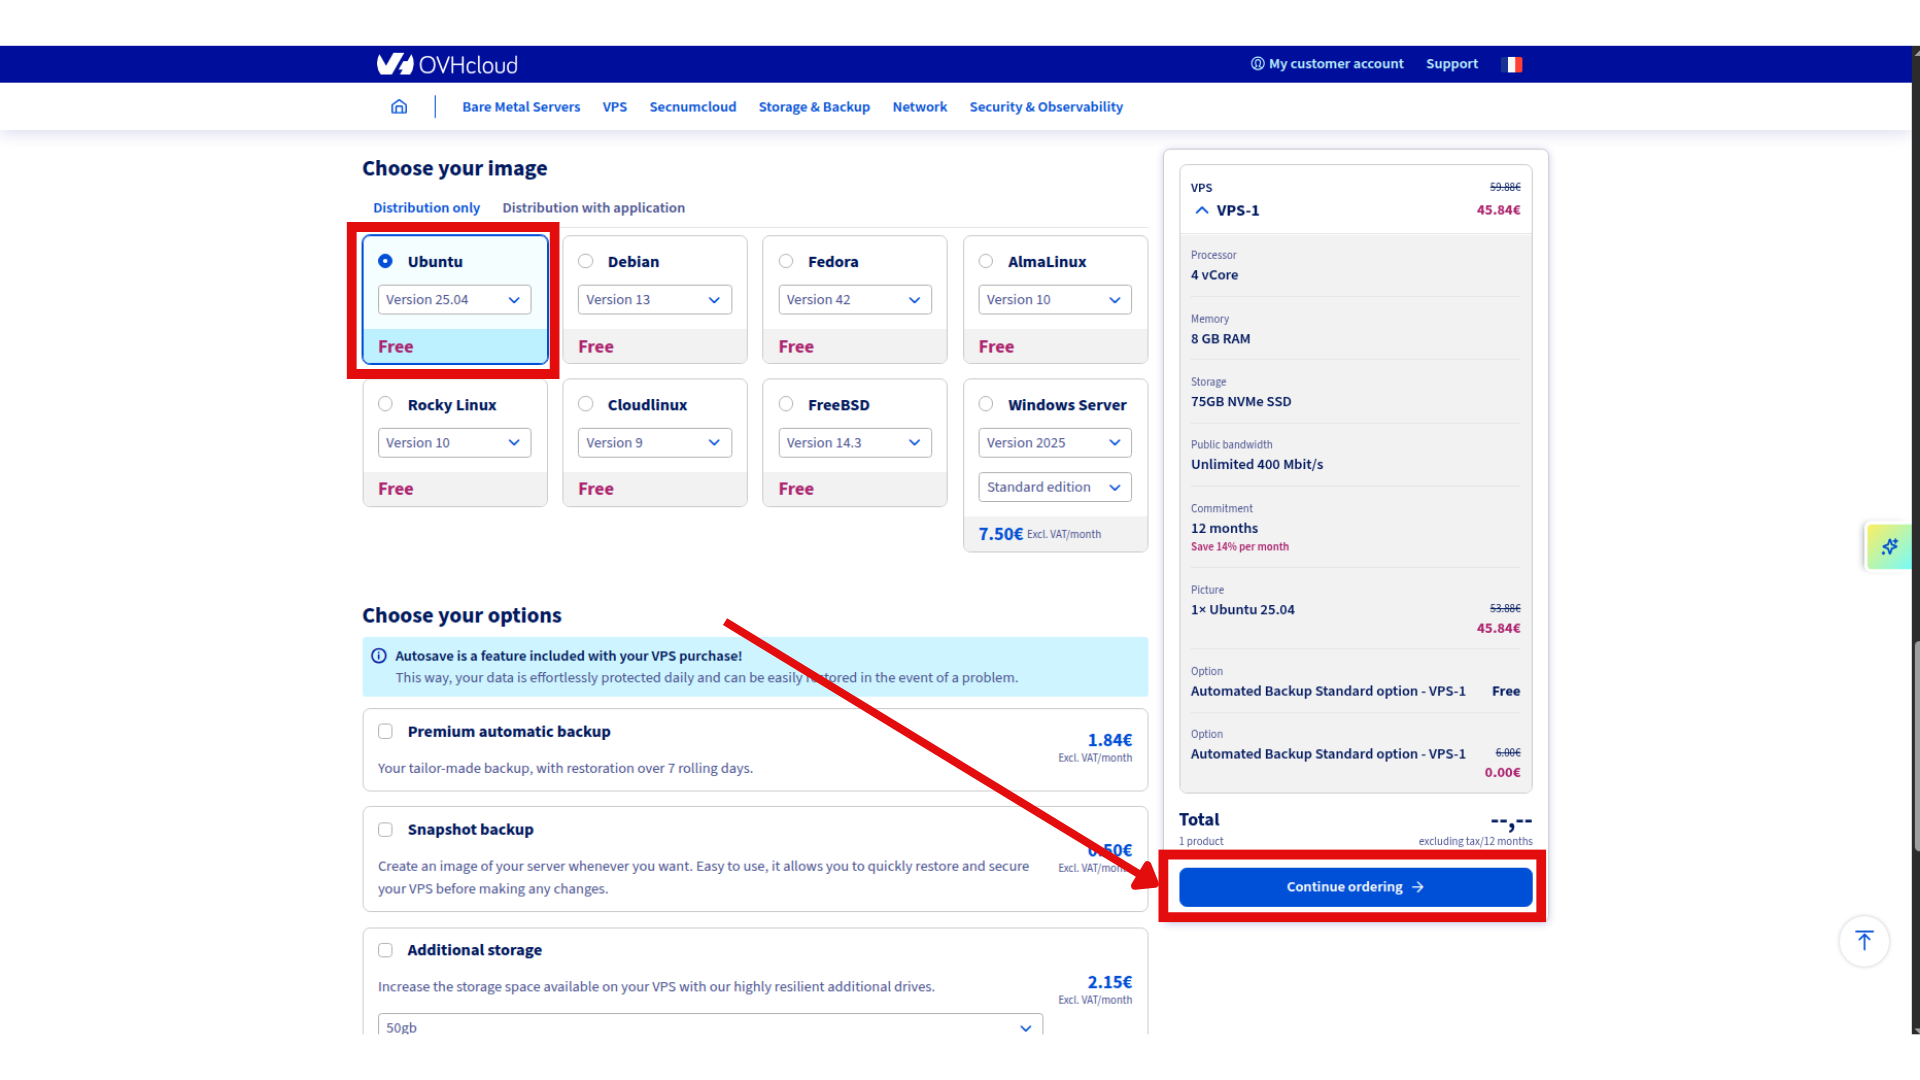
Order VPS
- Go to Bare Metal Cloud → Dedicated and Virtual Servers → Virtual Private Servers
- Click Order → Configure your VPS
- Select configuration:
- Model: VPS-1 (2 vCores, 8 GB RAM, 75GB Storage) or larger
- Region: Same as Object Storage
- Image: Ubuntu 25.04
- Complete order
Initial connection
Connect using credentials from delivery email:
ssh ubuntu@your_vps_ip
Change the temporary password when prompted, then reconnect.
Reference: OVHcloud VPS Getting Started guide
Install Plakar
SSH to the backup VPS and install Plakar:
ssh ubuntu@your-vps-ip
Follow the Plakar Installation Guide
Configure Object Storage
Install S3 integration
plakar pkg add s3
Add storage connector
plakar store add ovhcloud-s3-backups \
  location=s3://<S3_ENDPOINT>/<BUCKET_NAME> \
  access_key=<YOUR_ACCESS_KEY_ID> \
  secret_access_key=<YOUR_SECRET_ACCESS_KEY> \
  use_tls=true \
  passphrase='<YOUR_SECURE_PASSPHRASE>'
Replace:
<S3_ENDPOINT>: e.g.,s3.eu-west-par.io.cloud.ovh.net<BUCKET_NAME>: e.g.,plakar-backups<YOUR_ACCESS_KEY_ID>and<YOUR_SECRET_ACCESS_KEY>: From Step 1<YOUR_SECURE_PASSPHRASE>: Strong passphrase for encryption
 Passphrase
Configuring the passphrase in the store enables automated backups without prompts.
Initialize Kloset Store
plakar at "@ovhcloud-s3-backups" create
Configure SSH Access
Install SFTP integration
plakar pkg add sftp
Generate SSH keys
ssh-keygen -t ed25519 -f ~/.ssh/id_ed25519_plakar -C "plakar@backup"
Press Enter for no passphrase.
Copy keys to source servers
ssh-copy-id -i ~/.ssh/id_ed25519_plakar.pub user@source-server-1
ssh-copy-id -i ~/.ssh/id_ed25519_plakar.pub user@source-server-2
Test access:
ssh -i ~/.ssh/id_ed25519_plakar user@source-server-1 'echo "Success"'
Create SSH aliases
cat >> ~/.ssh/config << 'EOF'
Host source-1
    HostName source-server-1.example.com
    User backupuser
    Port 22
    IdentityFile ~/.ssh/id_ed25519_plakar

Host source-2
    HostName source-server-2.example.com
    User backupuser
    Port 22
    IdentityFile ~/.ssh/id_ed25519_plakar
EOF
Test:
ssh source-1 'echo "Alias works"'
Configure Backup Sources
Add source connectors for each server:
plakar source add web-server-1 sftp://source-1:/var/www
plakar source add web-server-2 sftp://source-2:/var/www
Verify:
plakar source show
Test Backup
Run a manual backup to verify configuration:
# Single source
plakar at "@ovhcloud-s3-backups" backup "@web-server-1"

# Multiple sources
plakar at "@ovhcloud-s3-backups" backup "@web-server-1" "@web-server-2"
List snapshots:
plakar at "@ovhcloud-s3-backups" ls
Schedule Automatic Backups
Create scheduler configuration
cat > ~/scheduler.yaml << 'EOF'
agent:
  tasks:
    - name: Backup web-server-1
      repository: "@ovhcloud-s3-backups"
      backup:
        path: "@web-server-1"
        interval: 24h
        check: true

    - name: Backup web-server-2
      repository: "@ovhcloud-s3-backups"
      backup:
        path: "@web-server-2"
        interval: 24h
        check: true
EOF
Scheduler
The scheduler is basic and will be improved in future versions.
Start scheduler
plakar scheduler start -tasks ~/scheduler.yaml
See Scheduler Documentation for more scheduling options.
Configure Systemd Services
Create scheduler service
cat << 'EOF' | sudo tee /etc/systemd/system/plakar-scheduler.service > /dev/null
[Unit]
Description=Plakar Scheduler
After=network.target

[Service]
Type=forking
ExecStart=/usr/bin/plakar scheduler start -tasks /home/ubuntu/scheduler.yaml
ExecStop=/usr/bin/plakar scheduler stop
Restart=on-failure
User=ubuntu
WorkingDirectory=/home/ubuntu

[Install]
WantedBy=multi-user.target
EOF
Create UI service
cat << 'EOF' | sudo tee /etc/systemd/system/plakar-ui.service > /dev/null
[Unit]
Description=Plakar Web UI
After=network.target

[Service]
Type=simple
ExecStart=/usr/bin/plakar at "@ovhcloud-s3-backups" ui -listen :8080
Restart=always
User=ubuntu
WorkingDirectory=/home/ubuntu

[Install]
WantedBy=multi-user.target
EOF
Installation Path
If Plakar is installed elsewhere, update the path. Use which plakar to find it.
Enable and start services
sudo systemctl daemon-reload
sudo systemctl enable plakar-scheduler plakar-ui
sudo systemctl start plakar-scheduler plakar-ui
Check status:
sudo systemctl status plakar-scheduler
sudo systemctl status plakar-ui
Access Web UI
When the UI service starts, Plakar automatically generates an access token. Retrieve it from the service logs:
sudo journalctl -u plakar-ui -n 100 --no-pager | grep -i token
You should see output similar to:
launching webUI at http://:8080?plakar_token=d9fccdbd-77a3-41a0-8657-24d77a6d00ac
Copy the plakar_token value from the URL and use it to access the UI: http://your-vps-ip:8080?plakar_token=<token>
Custom UI Token
From v1.1.0 onwards, you can set a custom token via the PLAKAR_UI_TOKEN environment variable instead of retrieving it from the logs. See the v1.1.0 version of this guide for details.
 Security
Configure firewall to restrict port 8080 access or use a reverse proxy with SSL.
Troubleshooting
Authentication errors
- Verify SSH keys and user permissions on source servers
Can’t connect to Object Storage
- Check S3 credentials and endpoint URL
- Verify passphrase:
plakar store show ovhcloud-s3-backups
Permission denied
- Ensure SSH user has read access to backup directories
Services won’t start
- Check status:
systemctl status plakar-scheduler - View logs:
journalctl -u plakar-schedulerorjournalctl -u plakar-ui
Alternative UI access
- Install Plakar locally and configure the same store with OVHcloud S3 credentials to access backups without VPS connection
Found a bug or mistake in the documentation? Create an issue on GitHub