
Beta Version
You're viewing documentation for version v1.1.0. Beta versions are subject to changes and may not represent the final stable release. Do not use in production environments.
Using OVHcloud VPS as a Dedicated Backup Server
Overview
This guide configures an OVHcloud VPS to automatically back up your servers to Object Storage. The setup uses Plakar to create encrypted, deduplicated snapshots on a scheduled interval with web UI monitoring.
Architecture
- Backup VPS: Runs Plakar and schedules backups
- Source servers: OVHcloud servers to back up
- OVHcloud Object Storage: Stores encrypted backups
Plakar + Scheduler"] subgraph Storage["OVHcloud Object Storage"] Kloset["Kloset Store
Encrypted & Deduplicated
Backup"] end Server1 -->|SSH/SFTP| BackupVPS Server2 -->|SSH/SFTP| BackupVPS ServerN -->|SSH/SFTP| BackupVPS BackupVPS -->|Store Snapshots| Kloset %% Apply classes class Server1,Server2,ServerN sourceBox class BackupVPS brandBox class Kloset storeBox class space1,space2,space3,space4 invisible %% Classes definitions classDef sourceBox fill:#ffe4e6,stroke:#cad5e2,stroke-width:1px classDef brandBox fill:#524cff,color:#ffffff,stroke:#524cff,stroke-width:2px classDef storeBox fill:#dbeafe,stroke:#60a5fa,stroke-width:2px classDef invisible fill:none,stroke:none,color:transparent linkStyle default stroke:#94a3b8,stroke-width:2px,stroke-dasharray:5 5
Prerequisites
- OVHcloud account with billing configured
- SSH access to source servers
- Basic familiarity with Plakar commands
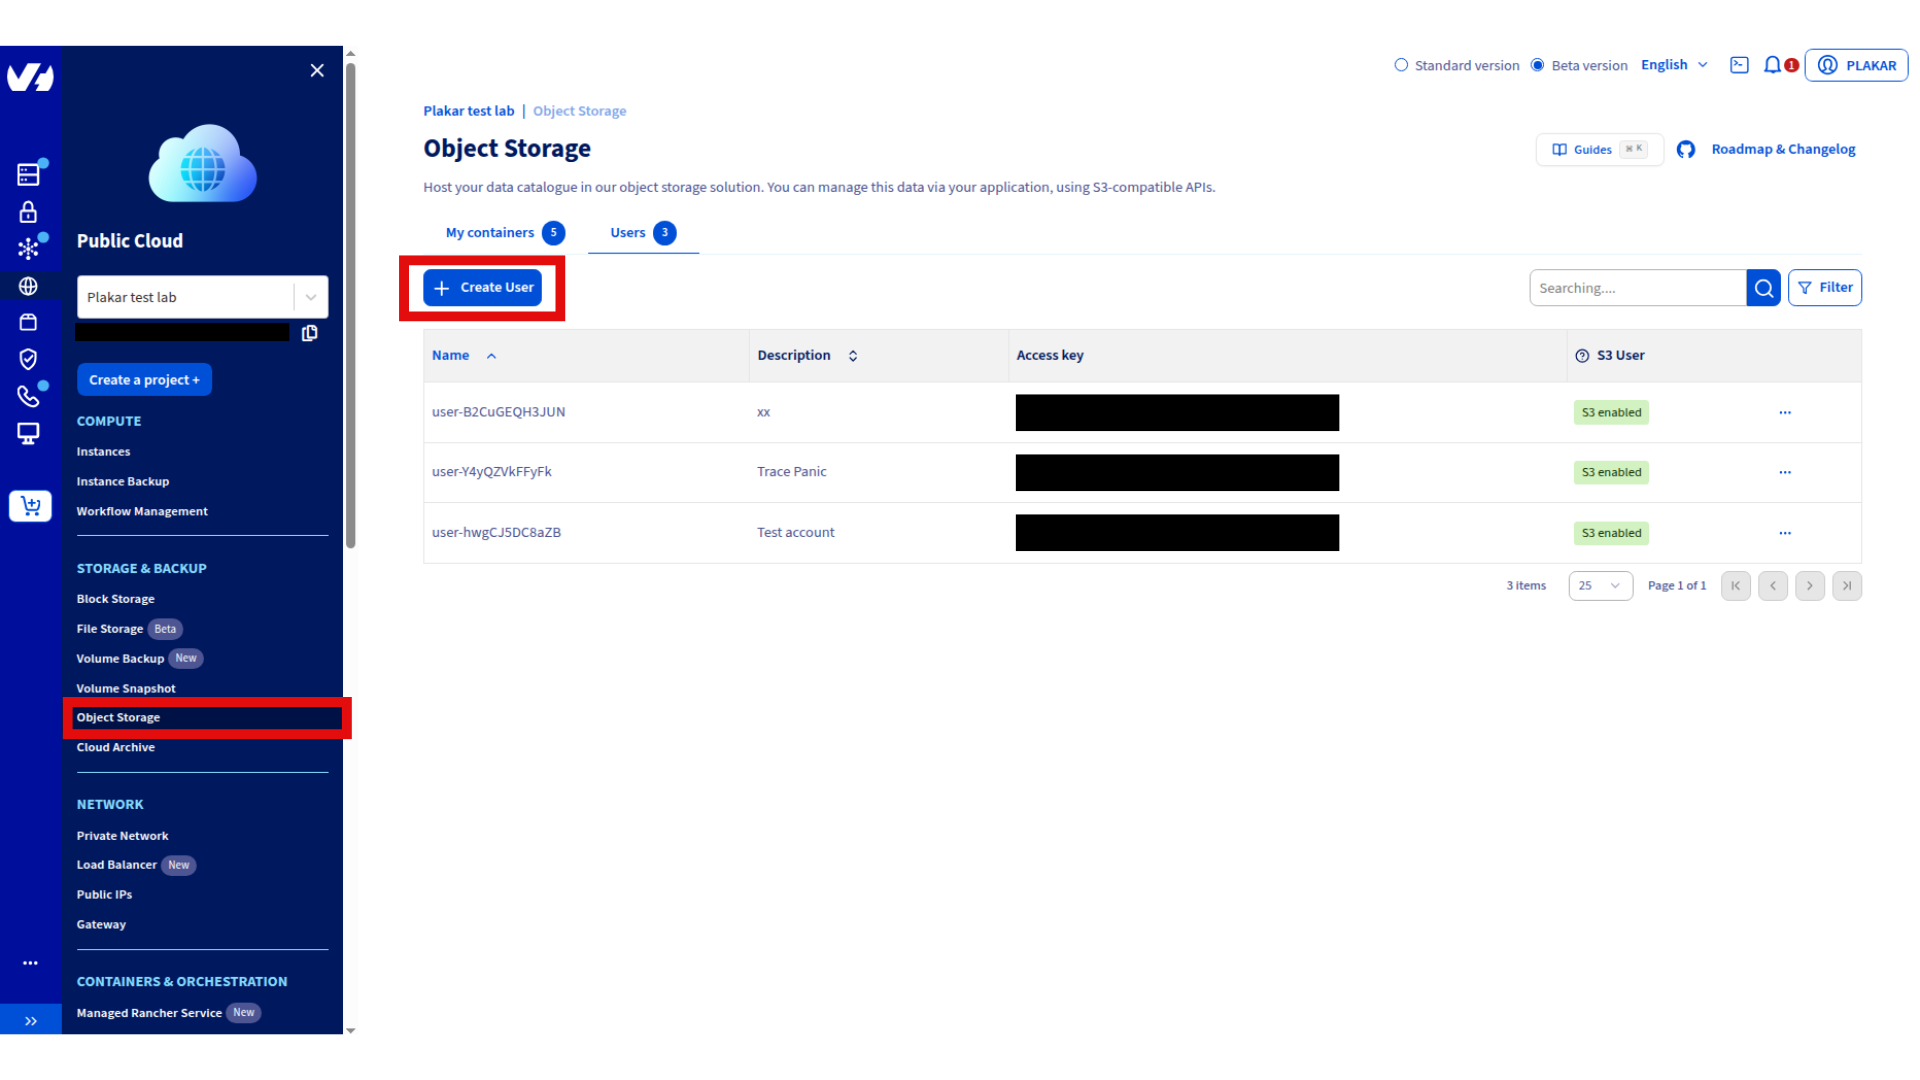
Create Object Storage
Create storage user
- Log in to OVHcloud Control Panel
- Navigate to Public Cloud → Storage & Backup → Object Storage → Users
- Click Create User
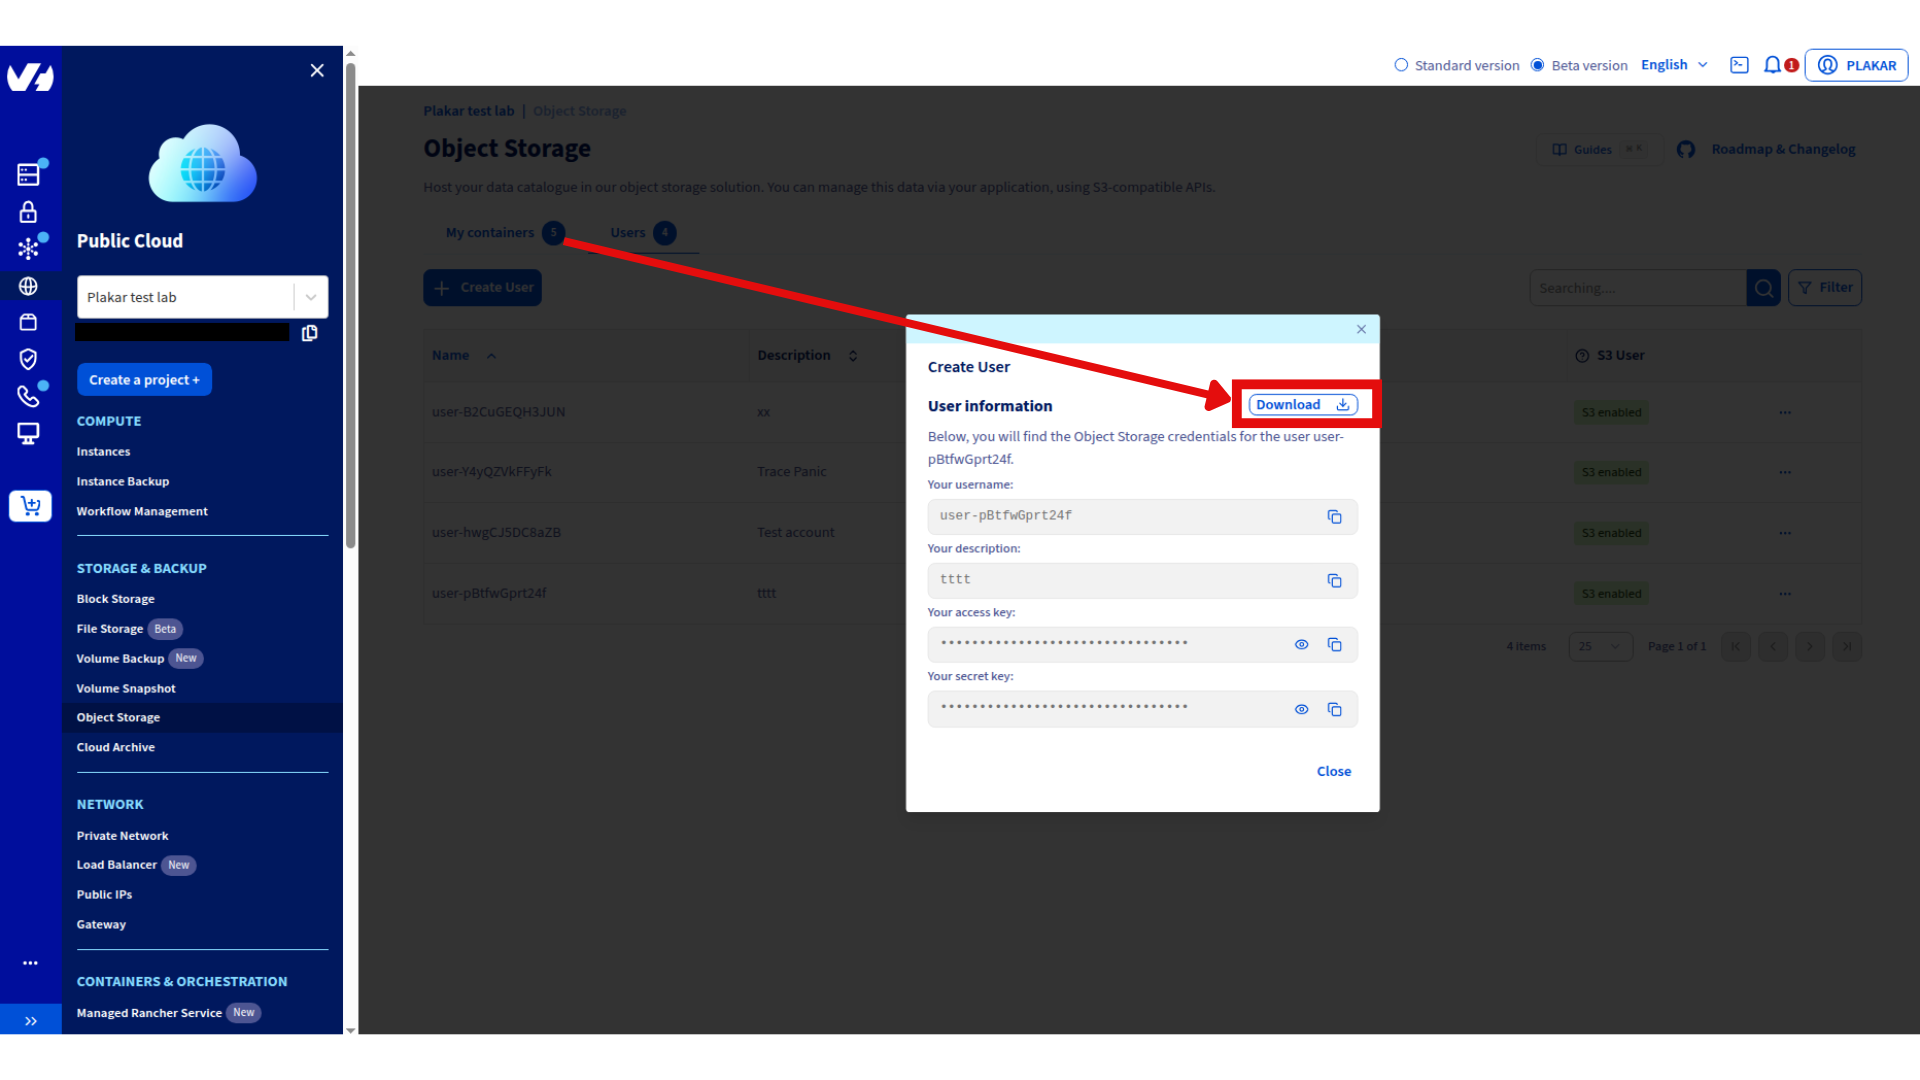
- Enter description and click Create
- Download and store credentials securely
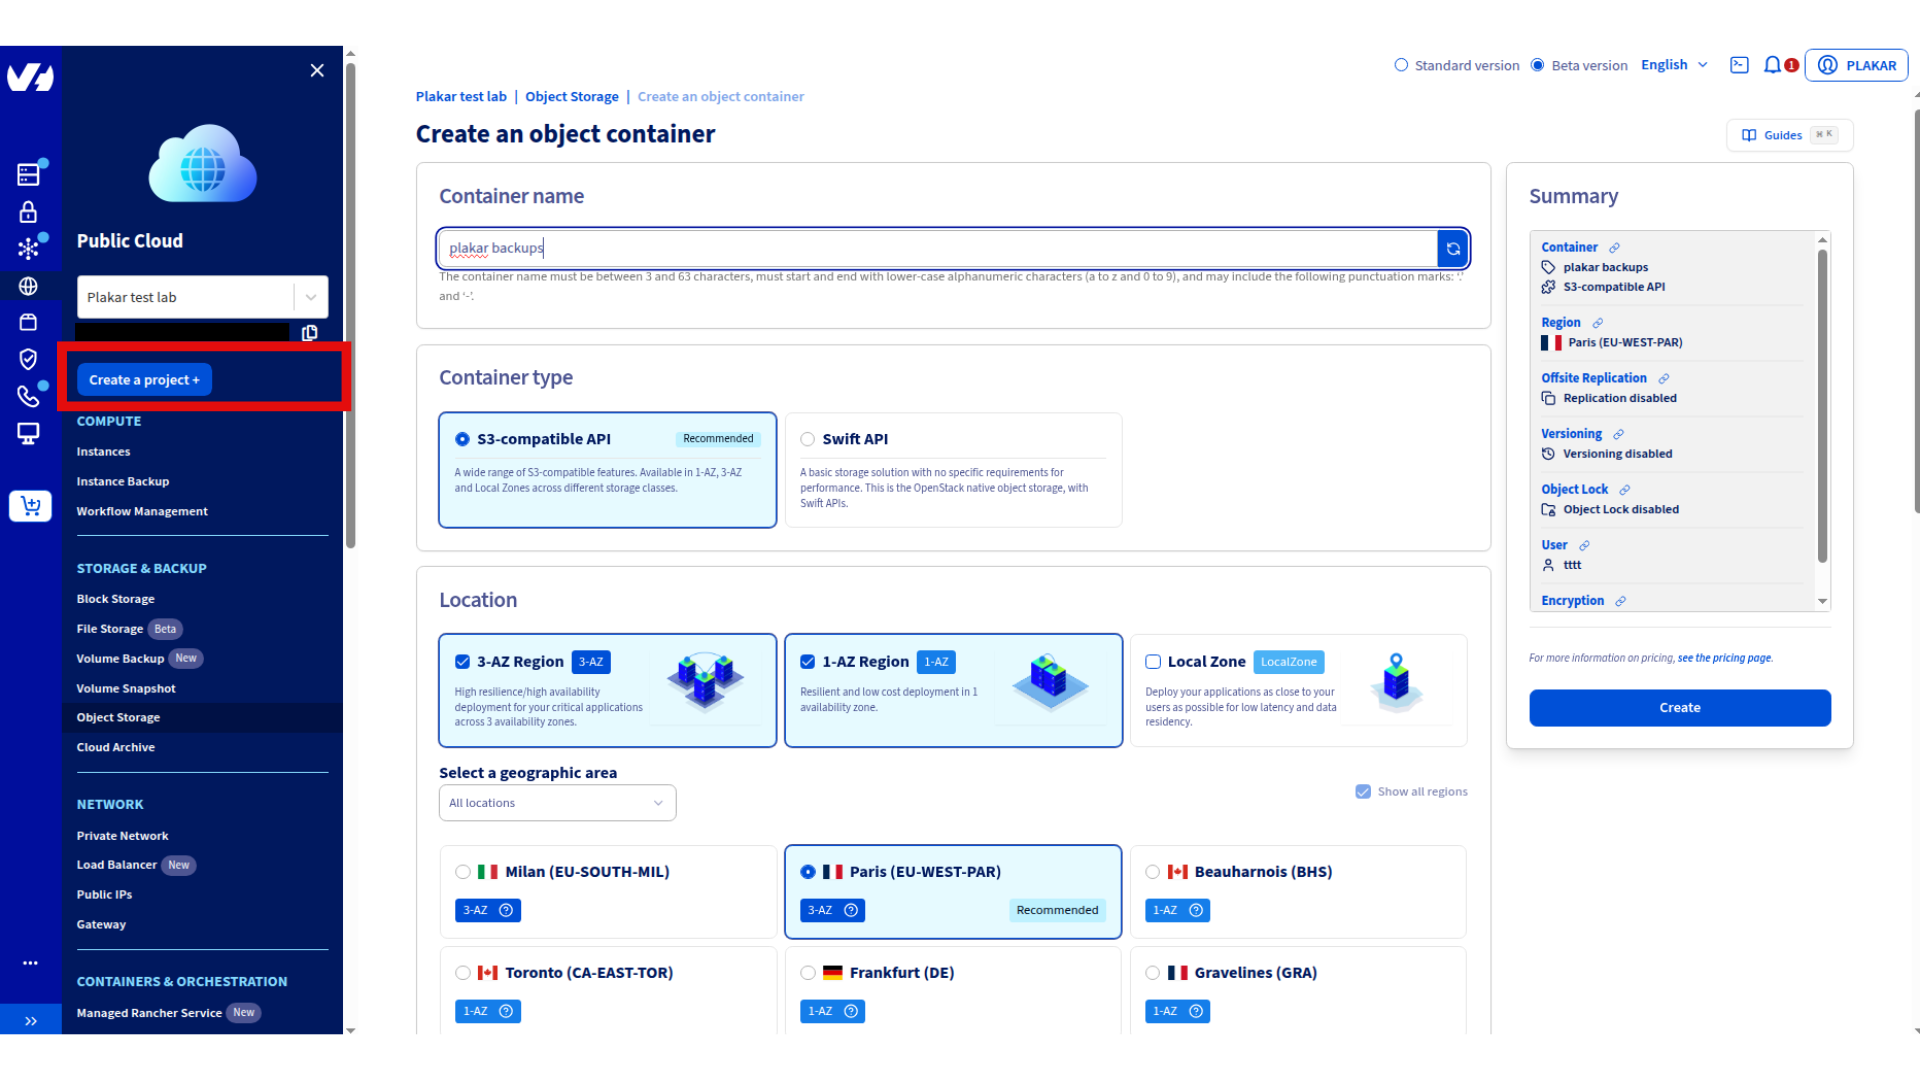
Create storage container
- Navigate to Public Cloud → Storage & Backup → Object Storage
- Click Create an Object Storage container
- Configure:
- Name:
plakar-backups - Container API: S3-compatible API
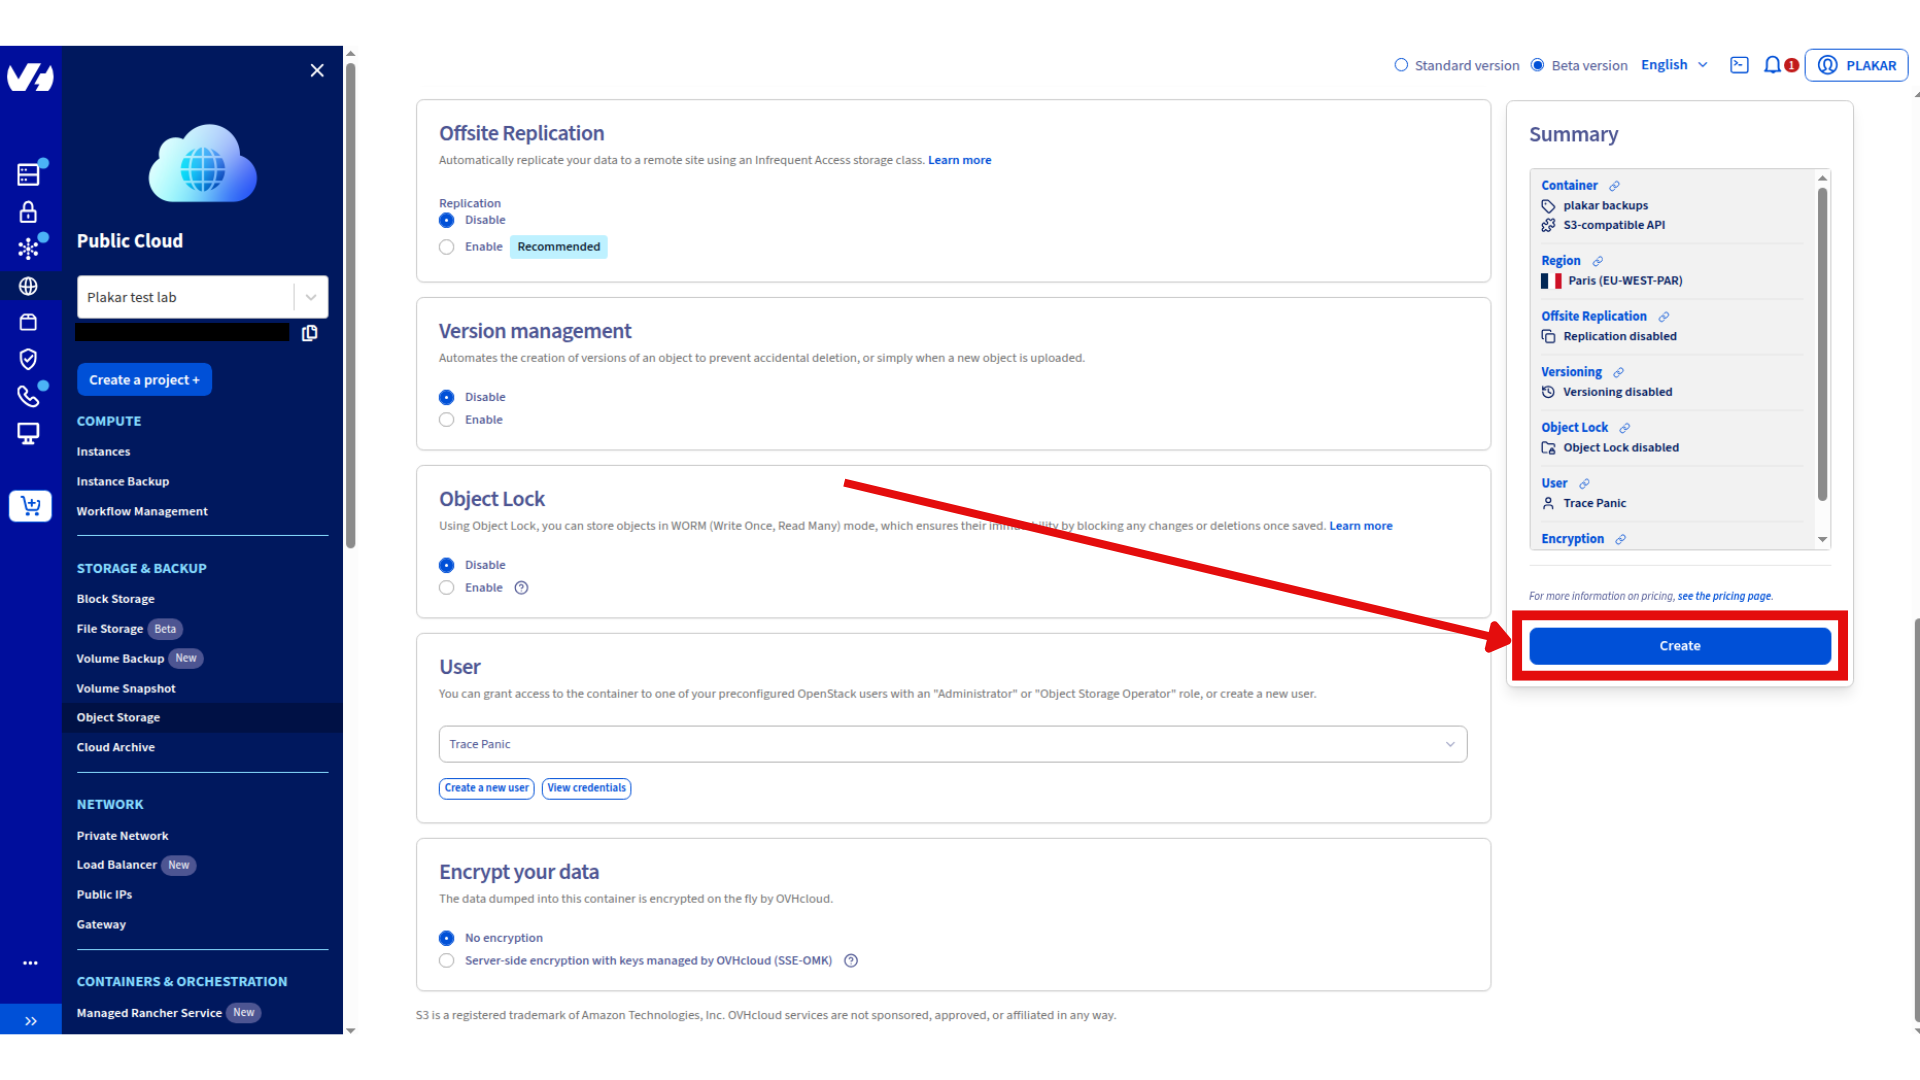
- User: Select the user created above
- Deployment: Choose 3-AZ (high availability) or 1-AZ (cost efficient)
- Region: Select location closest to your servers
- Name:
- Click Create
Reference: OVHcloud S3 Object Storage documentation
Provision Backup VPS
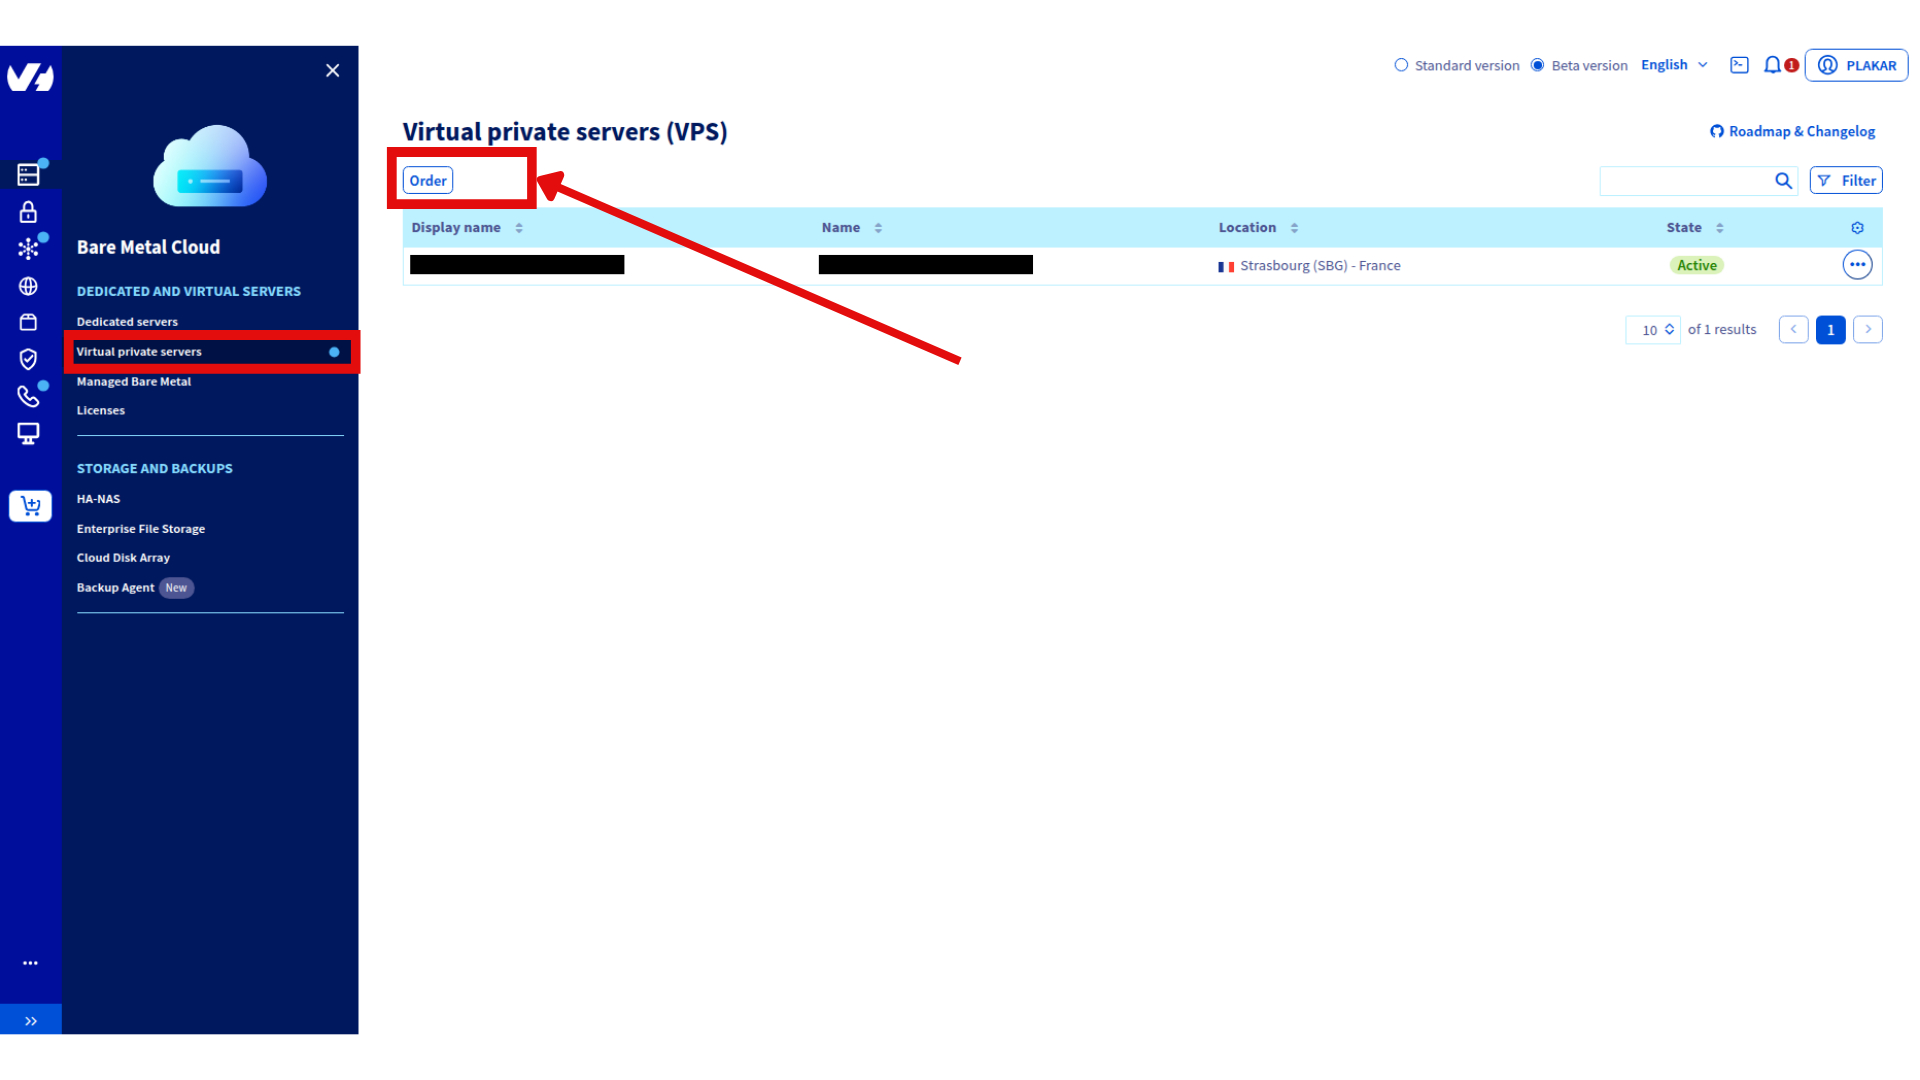
Order VPS
- Go to Bare Metal Cloud → Dedicated and Virtual Servers → Virtual Private Servers
- Click Order → Configure your VPS
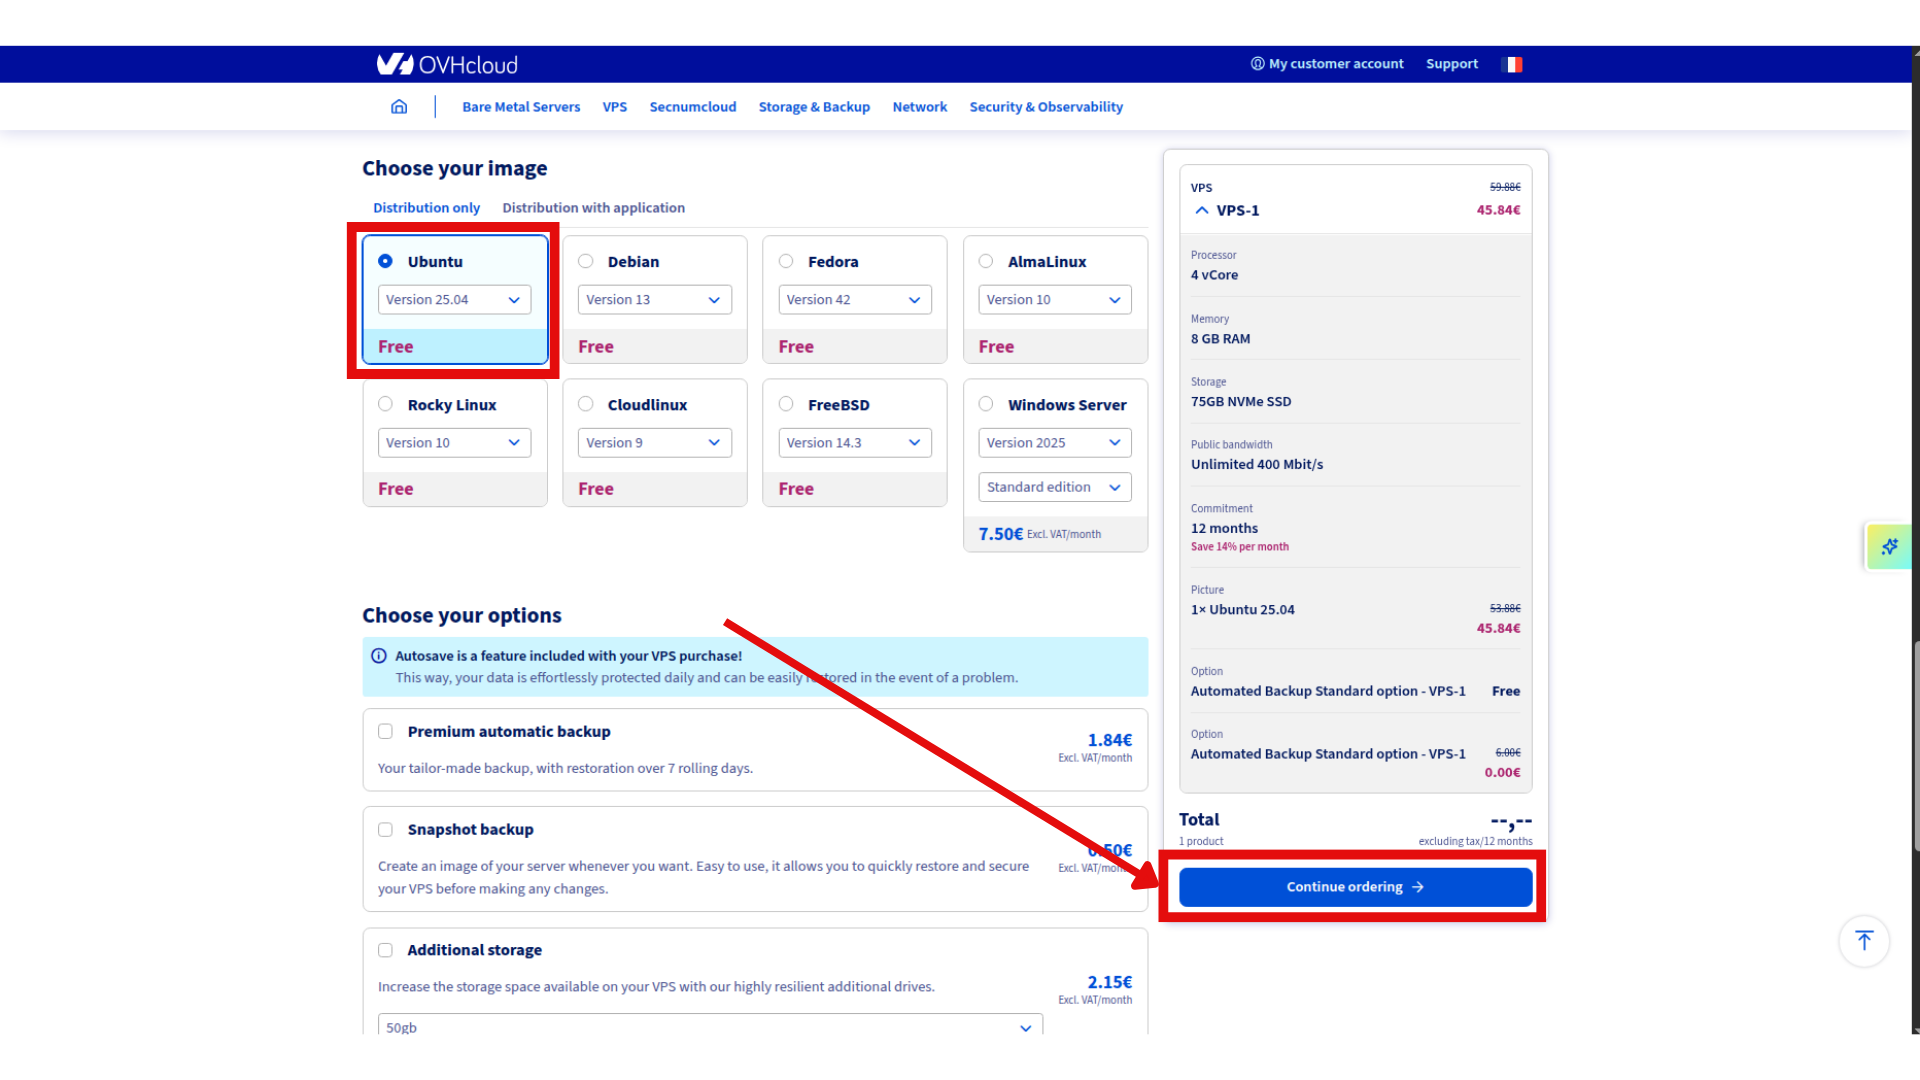
- Select configuration:
- Model: VPS-1 (2 vCores, 8 GB RAM, 75GB Storage) or larger
- Region: Same as Object Storage
- Image: Ubuntu 25.04
- Complete order
Initial connection
Connect using credentials from delivery email:
ssh ubuntu@your_vps_ip
Change the temporary password when prompted, then reconnect.
Reference: OVHcloud VPS Getting Started guide
Install Plakar
SSH to the backup VPS and install Plakar:
ssh ubuntu@your-vps-ip
Follow the Plakar Installation Guide
Configure Object Storage
Install S3 integration
plakar pkg add s3
Add storage connector
plakar store add ovhcloud-s3-backups \
  location=s3://<S3_ENDPOINT>/<BUCKET_NAME> \
  access_key=<YOUR_ACCESS_KEY_ID> \
  secret_access_key=<YOUR_SECRET_ACCESS_KEY> \
  use_tls=true \
  passphrase='<YOUR_SECURE_PASSPHRASE>'
Replace:
<S3_ENDPOINT>: e.g.,s3.eu-west-par.io.cloud.ovh.net<BUCKET_NAME>: e.g.,plakar-backups<YOUR_ACCESS_KEY_ID>and<YOUR_SECRET_ACCESS_KEY>: From Step 1<YOUR_SECURE_PASSPHRASE>: Strong passphrase for encryption
 Passphrase
Configuring the passphrase in the store enables automated backups without prompts.
Initialize Kloset Store
plakar at "@ovhcloud-s3-backups" create
Configure SSH Access
Install SFTP integration
plakar pkg add sftp
Generate SSH keys
ssh-keygen -t ed25519 -f ~/.ssh/id_ed25519_plakar -C "plakar@backup"
Press Enter for no passphrase.
Copy keys to source servers
ssh-copy-id -i ~/.ssh/id_ed25519_plakar.pub user@source-server-1
ssh-copy-id -i ~/.ssh/id_ed25519_plakar.pub user@source-server-2
Test access:
ssh -i ~/.ssh/id_ed25519_plakar user@source-server-1 'echo "Success"'
Create SSH aliases
cat >> ~/.ssh/config << 'EOF'
Host source-1
    HostName source-server-1.example.com
    User backupuser
    Port 22
    IdentityFile ~/.ssh/id_ed25519_plakar

Host source-2
    HostName source-server-2.example.com
    User backupuser
    Port 22
    IdentityFile ~/.ssh/id_ed25519_plakar
EOF
Test:
ssh source-1 'echo "Alias works"'
Configure Backup Sources
Add source connectors for each server:
plakar source add web-server-1 sftp://source-1:/var/www
plakar source add web-server-2 sftp://source-2:/var/www
Verify:
plakar source show
Test Backup
Run a manual backup to verify configuration:
# Single source
plakar at "@ovhcloud-s3-backups" backup "@web-server-1"

# Multiple sources
plakar at "@ovhcloud-s3-backups" backup "@web-server-1" "@web-server-2"
List snapshots:
plakar at "@ovhcloud-s3-backups" ls
Schedule Automatic Backups
Create scheduler configuration
cat > ~/scheduler.yaml << 'EOF'
agent:
  tasks:
    - name: Backup web-server-1
      repository: "@ovhcloud-s3-backups"
      backup:
        path: "@web-server-1"
        interval: 24h
        check: true

    - name: Backup web-server-2
      repository: "@ovhcloud-s3-backups"
      backup:
        path: "@web-server-2"
        interval: 24h
        check: true
EOF
Scheduler
The scheduler is basic and will be improved in future versions.
Start scheduler
plakar scheduler start -tasks ~/scheduler.yaml
See Scheduler Documentation for more scheduling options.
Configure Systemd Services
Create scheduler service
cat << 'EOF' | sudo tee /etc/systemd/system/plakar-scheduler.service > /dev/null
[Unit]
Description=Plakar Scheduler
After=network.target

[Service]
Type=forking
ExecStart=/usr/bin/plakar scheduler start -tasks /home/ubuntu/scheduler.yaml
ExecStop=/usr/bin/plakar scheduler stop
Restart=on-failure
User=ubuntu
WorkingDirectory=/home/ubuntu

[Install]
WantedBy=multi-user.target
EOF
Create UI service
cat << 'EOF' | sudo tee /etc/systemd/system/plakar-ui.service > /dev/null
[Unit]
Description=Plakar Web UI
After=network.target

[Service]
Type=simple
ExecStart=/usr/bin/plakar at "@ovhcloud-s3-backups" ui -listen :8080
Restart=always
User=ubuntu
WorkingDirectory=/home/ubuntu

[Install]
WantedBy=multi-user.target
EOF
Installation Path
If Plakar is installed elsewhere, update the path. Use which plakar to find it.
Enable and start services
sudo systemctl daemon-reload
sudo systemctl enable plakar-scheduler plakar-ui
sudo systemctl start plakar-scheduler plakar-ui
Check status:
sudo systemctl status plakar-scheduler
sudo systemctl status plakar-ui
Access Web UI
Option 1: Custom token (recommended)
Update the UI service with a custom token:
cat << 'EOF' | sudo tee /etc/systemd/system/plakar-ui.service > /dev/null
[Unit]
Description=Plakar Web UI
After=network.target

[Service]
Type=simple
Environment="PLAKAR_UI_TOKEN=your-secure-token-here"
ExecStart=/usr/bin/plakar at "@ovhcloud-s3-backups" ui -listen :8080
Restart=always
User=ubuntu
WorkingDirectory=/home/ubuntu

[Install]
WantedBy=multi-user.target
EOF
Reload and restart:
sudo systemctl daemon-reload
sudo systemctl restart plakar-ui
Access: http://your-vps-ip:8080?plakar_token=your-secure-token-here
Option 2: Auto-generated token
Retrieve the token from logs:
sudo journalctl -u plakar-ui -n 100 --no-pager | grep -i token
Look for:
launching webUI at http://:8080?plakar_token=d9fccdbd-77a3-41a0-8657-24d77a6d00ac
Access: http://your-vps-ip:8080 with the token from the URL.
 Security
Configure firewall to restrict port 8080 access or use a reverse proxy with SSL.
Troubleshooting
Authentication errors
- Verify SSH keys and user permissions on source servers
Can’t connect to Object Storage
- Check S3 credentials and endpoint URL
- Verify passphrase:
plakar store show ovhcloud-s3-backups
Permission denied
- Ensure SSH user has read access to backup directories
Services won’t start
- Check status:
systemctl status plakar-scheduler - View logs:
journalctl -u plakar-schedulerorjournalctl -u plakar-ui
Alternative UI access
- Install Plakar locally and configure the same store with OVHcloud S3 credentials to access backups without VPS connection
Found a bug or mistake in the documentation? Create an issue on GitHub