
Beta Version
You're viewing documentation for version v1.1.0. Beta versions are subject to changes and may not represent the final stable release. Do not use in production environments.
Setup an OVHcloud VPS as a Dedicated Backup Server
Introduction
This tutorial shows you how to create a dedicated backup server on OVHcloud that automatically backs up your other servers to an Object Storage. By the end, you’ll have a VPS running Plakar that backs up your servers on a scheduled interval, with a web UI to monitor the backups.
Architecture Overview
The system consists of three components:
- Backup VPS: Runs Plakar and schedules backups
- Source servers: Your OVHcloud servers that need to be backed up
- OVHcloud Object Storage: Stores the backups in a Kloset Store.
Plakar + Scheduler"] subgraph Storage["OVHcloud S3 Object Storage"] Kloset["Kloset Store
Encrypted & Deduplicated
Backup"] end Server1 -->|SSH/SFTP| BackupVPS Server2 -->|SSH/SFTP| BackupVPS ServerN -->|SSH/SFTP| BackupVPS BackupVPS -->|Store Snapshots| Storage %% Apply classes class Server1,Server2,ServerN sourceBox class BackupVPS brandBox class Storage,Kloset storeBox %% Classes definitions classDef sourceBox fill:#ffe4e6,stroke:#cad5e2,stroke-width:1px classDef brandBox fill:#524cff,color:#ffffff classDef storeBox fill:#dbeafe,stroke:#cad5e2,stroke-width:1px linkStyle default stroke-dasharray: 9,5,stroke-dashoffset: 900,animation: dash 25s linear infinite;
Step 1: Create OVHcloud Object Storage
Before you can store backups, you need to set up an S3-compatible storage location. OVHcloud Object Storage provides scalable, durable storage that Plakar can use as a backend. This approach separates your backup data from your VPS, ensuring backups survive even if your VPS fails.
First, you’ll need to create a user who can be assigned to access containers. You’ll need access credentials to connect Plakar to your Object Storage:
- Log in to the OVHcloud Control Panel
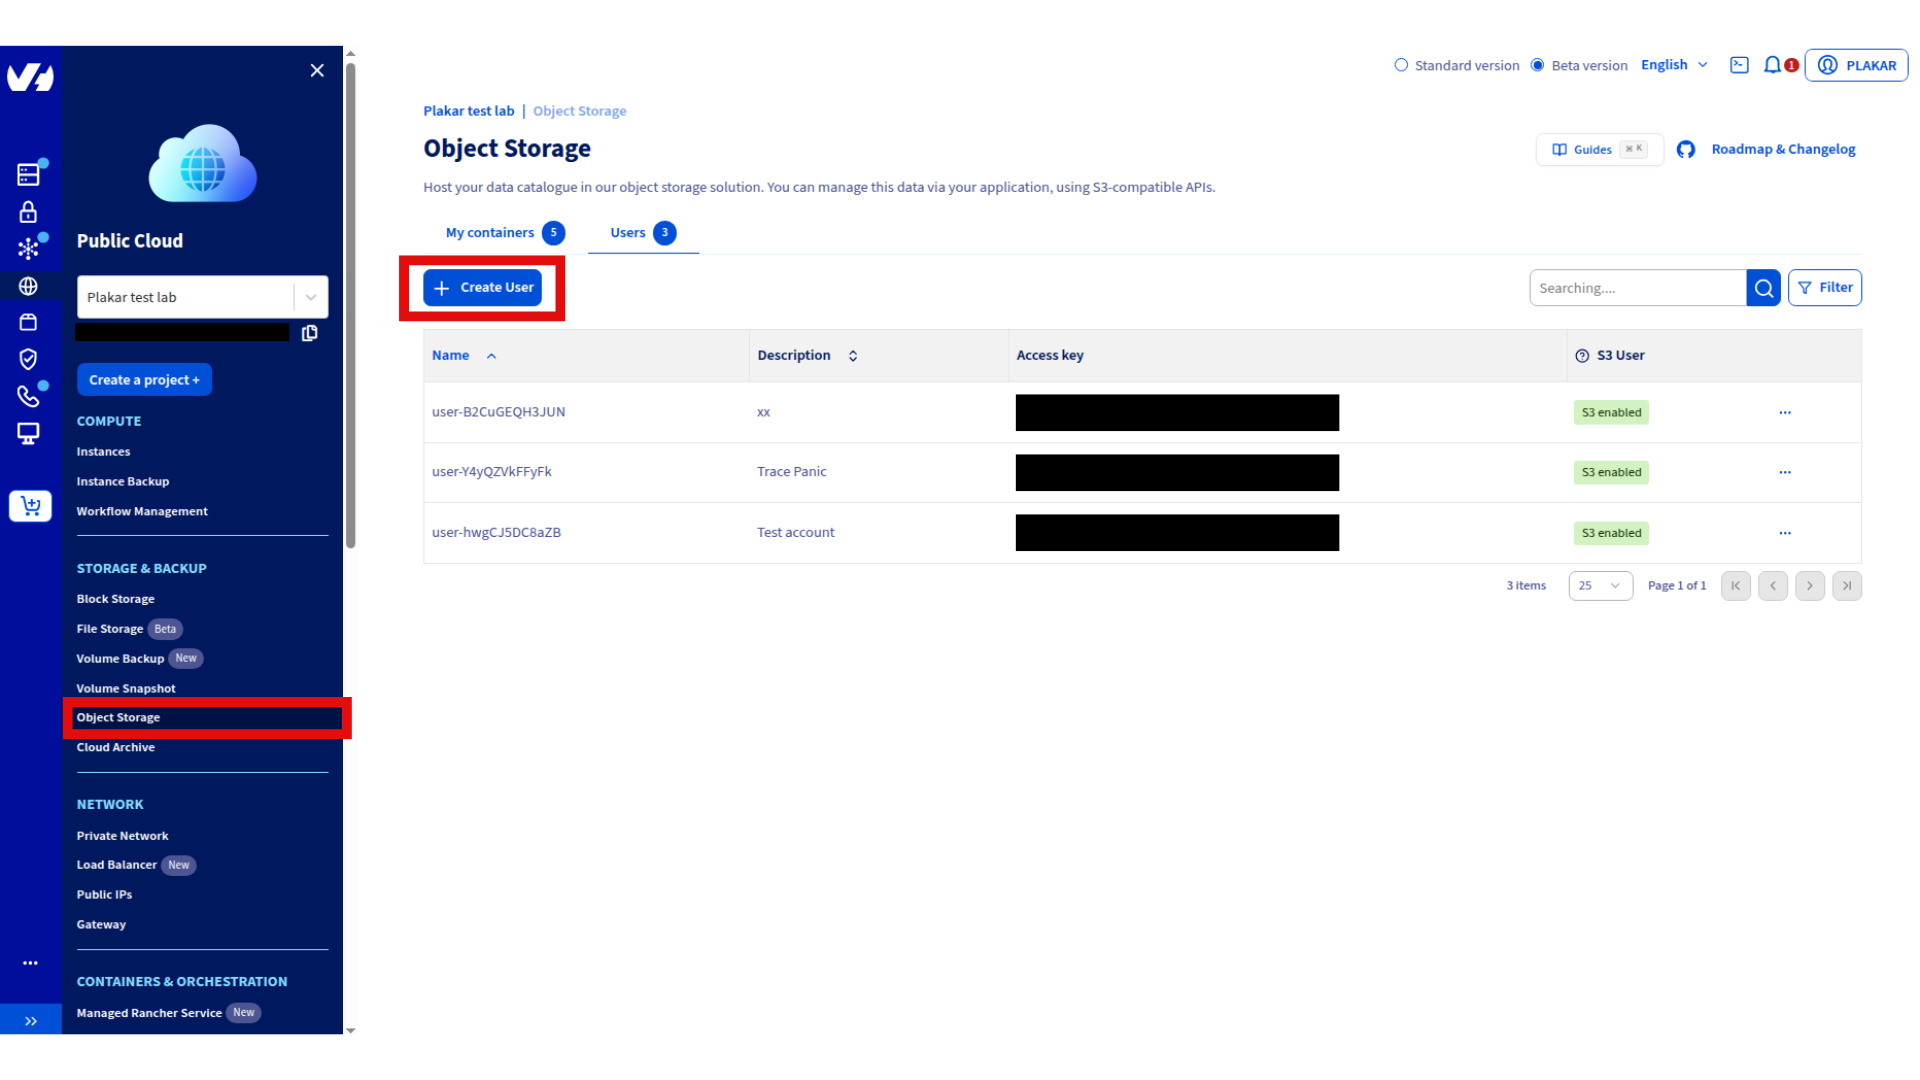
- Navigate to Public Cloud → Storage & Backup → Object Storage
- Go to the Users tab then click on Create User (if you have no users yet)
- Enter a description for the user and click Create
- Download the information provided and store them securely.

Next, you’ll create an S3-compatible Object Storage container to store your backups.
- Log in to the OVHcloud Control Panel
- Navigate to Public Cloud → Storage & Backup → Object Storage
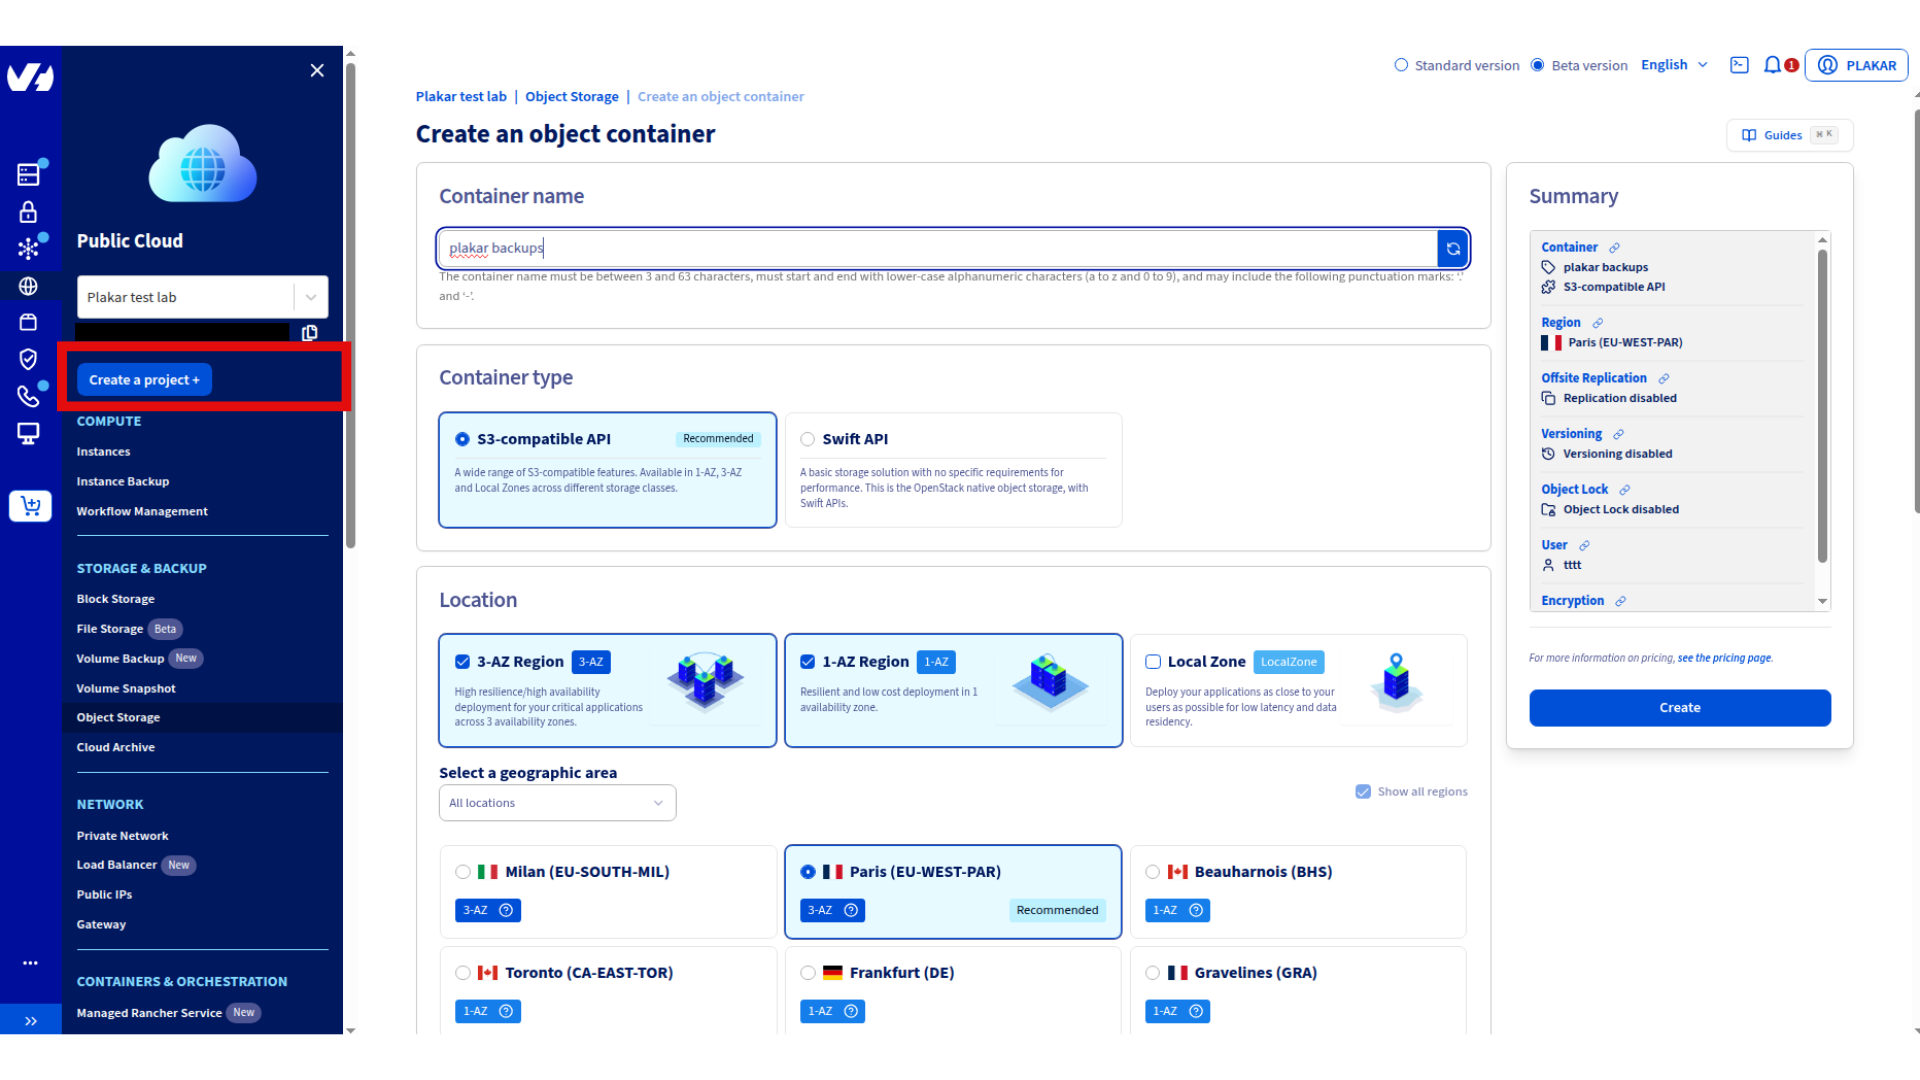
- If you don’t have a project, click Create Project and follow the prompts
- Click Create an Object Storage container
- Configure your container:
- Name: Choose a descriptive name like
plakar-backups - Container API: Select S3-compatible API
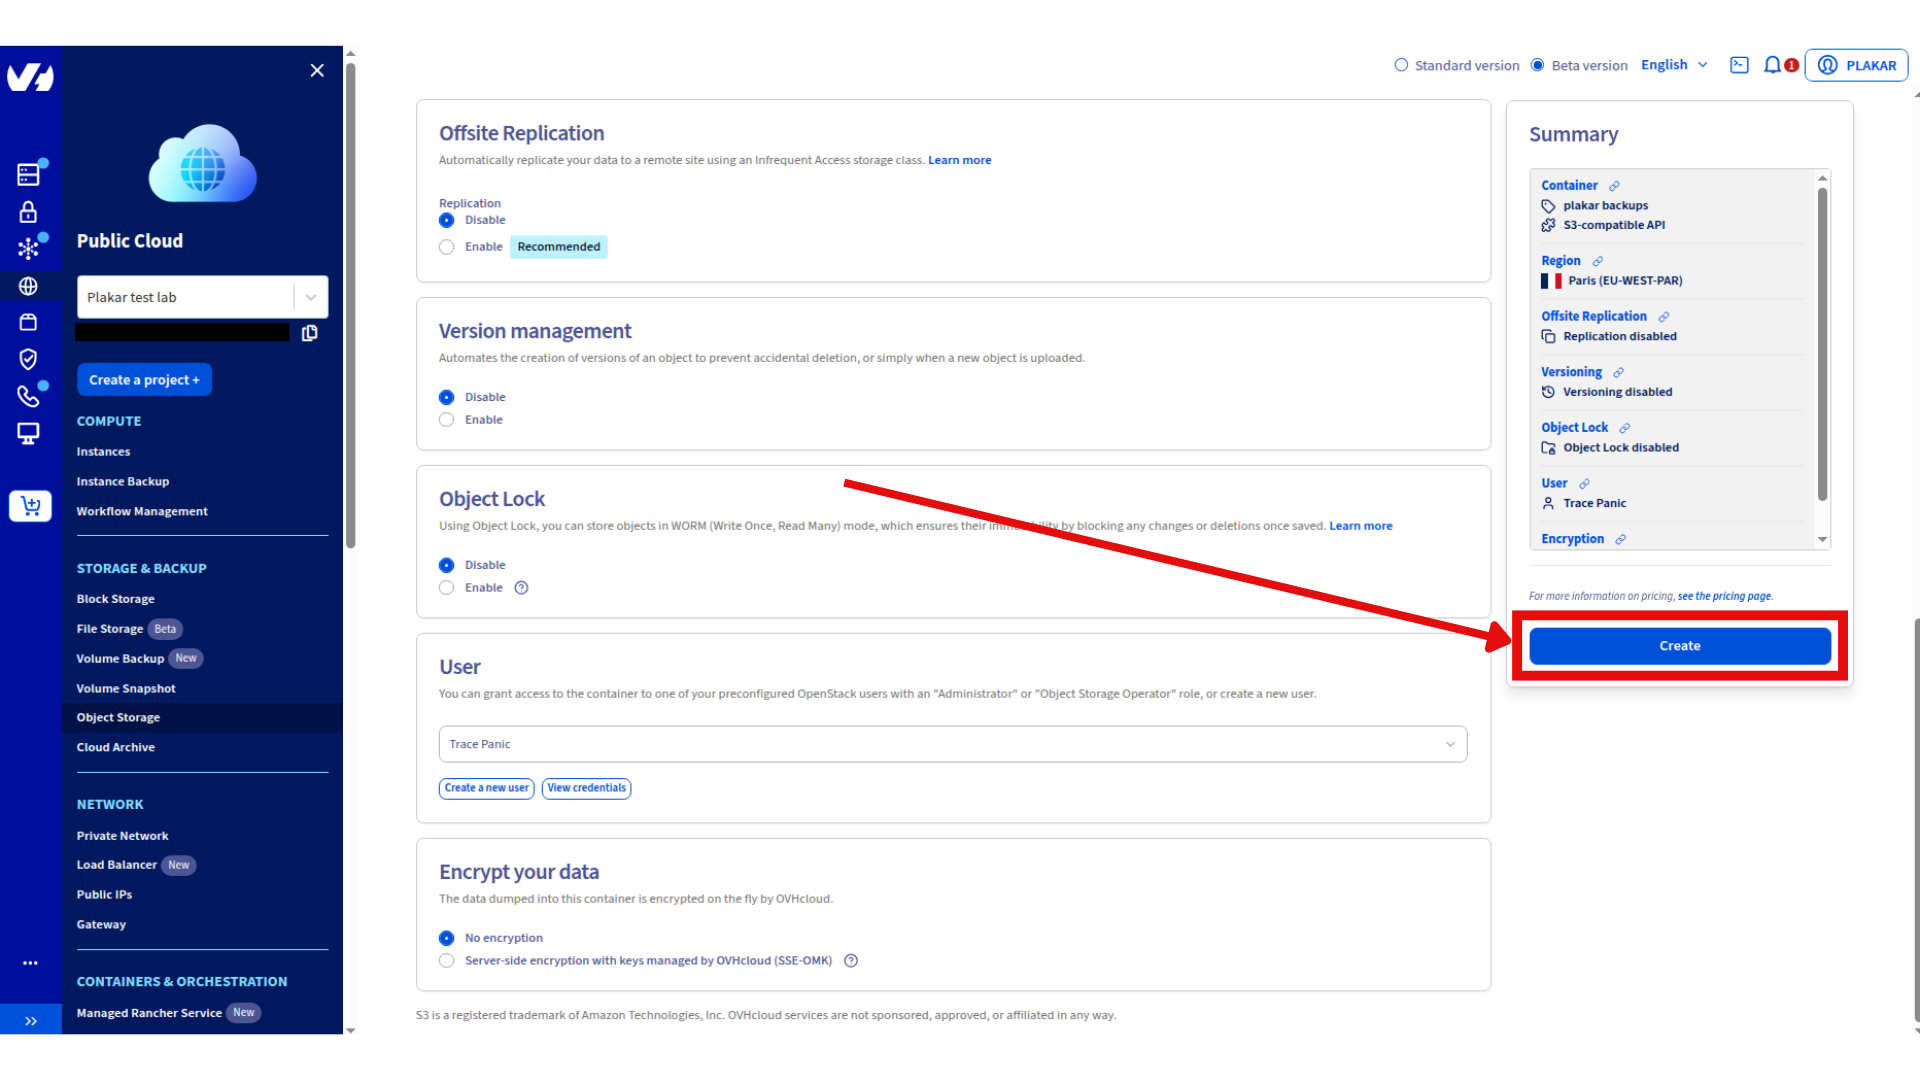
- User selection: Select the user you created to give him access to the container
- Deployment strategy: Choose based on your needs (3-AZ for high availability, 1-AZ for cost efficiency)
- Region: Select the location closest to your servers
- Name: Choose a descriptive name like
- Click Create
For detailed instructions, see the OVHcloud S3 Object Storage documentation.
Step 2: Provision Your Backup VPS
You need a dedicated server to run Plakar continuously. While you could run backups from your local machine, a VPS provides several advantages: it runs 24/7 and it doesn’t depend on your local infrastructure to stay online.
Create a VPS to run your backup server:
- In the OVHcloud Control Panel, go to Bare Metal Cloud → Dedicated and Virtual Servers → Virtual Private Servers
- Click on Order then on the next page click on Configure your VPS
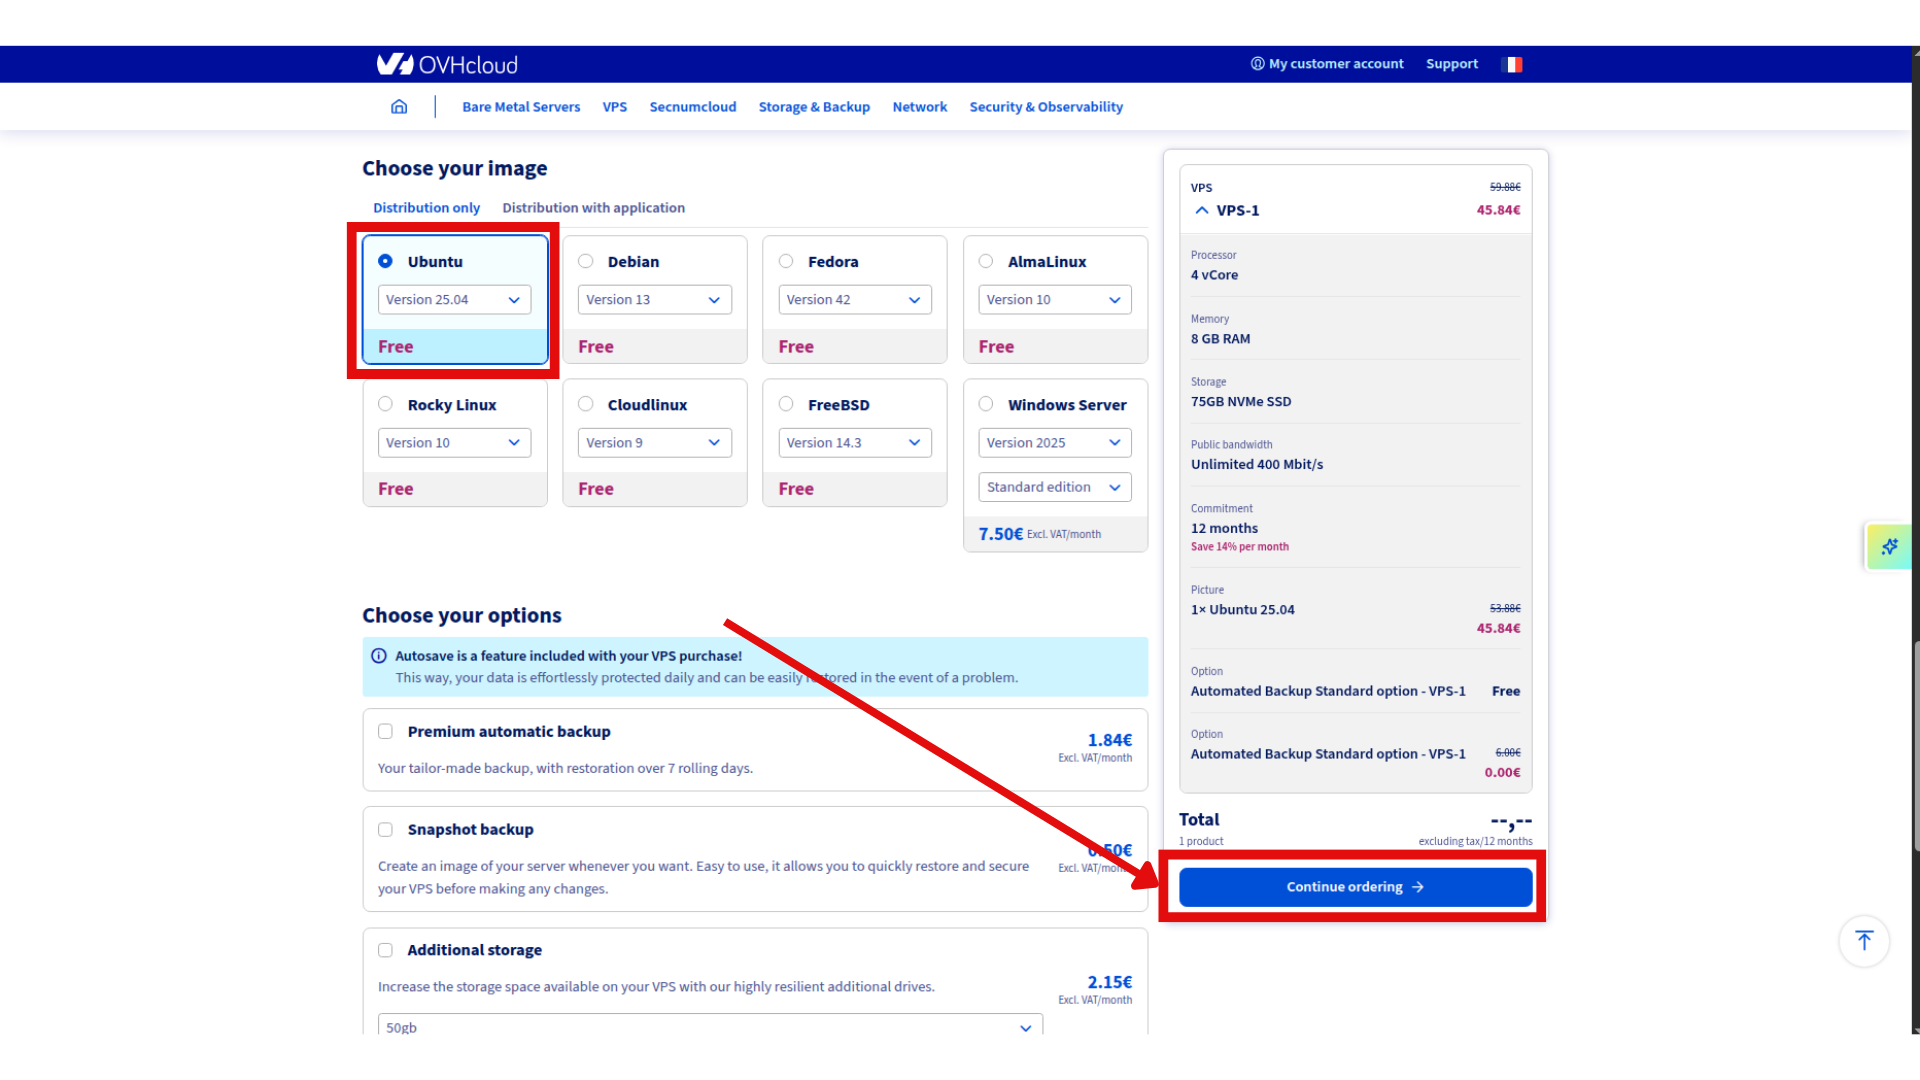
- Select your configuration:
- Model: Start with a general purpose instance e.g VPS-1 (2 vCores, 8 GB RAM, 75GB Storage)
- Region: Same region as your Object Storage for best performance
- Image: Distribution only, Ubuntu 25.04 (you can use any image you prefer)
- Order your VPS

Initial VPS Setup
When you first receive your VPS, you’ll get a delivery email with connection details. For security reasons, OVHcloud creates a default username based on your chosen operating system (e.g., ubuntu for Ubuntu, debian for Debian).
The temporary password is sent via a secure link in your delivery email. Connect to your VPS:
ssh ubuntu@your_vps_ip
Replace ubuntu with your actual username and your_vps_ip with the IP address from your delivery email.
On first login, you’ll be prompted to change the temporary password. After changing it, the session will close automatically. Reconnect with your new password.
For more details on VPS initial setup and security, see the OVHcloud VPS Getting Started guide.
Step 3: Install Plakar
Now that your VPS is ready, you need to install Plakar to handle all backup operations, deduplication, encryption, and storage management.
SSH into your new backup VPS and install Plakar:
ssh ubuntu@your-vps-ip
Install Plakar to your VPS using Plakar Installation Guide
Step 4: Configure OVHcloud Object Storage in Plakar
In this step, you’ll connect Plakar to the OVHcloud S3-compatible Object Storage you created earlier and initialize it as a Kloset Store.
Install the S3 integration
First, login to Plakar so you can install integrations:
plakar login -email you@example.com
# OR
plakar login -github
Once logged in, install the S3 integration:
plakar pkg add s3
Add OVHcloud S3 storage as a Storage Connector
Storage connectors in Plakar define where backups are stored. By configuring this once, you can reference it in all future backup commands using a simple alias.
Now, add your OVHcloud Object Storage as a storage connector. Use the S3 endpoint and credentials you generated earlier:
plakar store add ovhcloud-s3-backups \
  location=s3://<S3_ENDPOINT>/<BUCKET_NAME> \
  access_key=<YOUR_ACCESS_KEY_ID> \
  secret_access_key=<YOUR_SECRET_ACCESS_KEY> \
  use_tls=true \
  passphrase='<YOUR_SECURE_PASSPHRASE>'
Replace:
<S3_ENDPOINT>with your OVHcloud S3 endpoint (e.g.,s3.eu-west-par.io.cloud.ovh.net)<BUCKET_NAME>with the container name you created (e.g.,plakar-backups)<YOUR_ACCESS_KEY_ID>and<YOUR_SECRET_ACCESS_KEY>with the credentials generated in Step 1<YOUR_SECURE_PASSPHRASE>with a strong passphrase for encrypting your backups (use single quotes if it contains special characters)
 Configuring Passphrase
By configuring the passphrase in the store, automated backups will run without prompting for credentials.
Initialize the Kloset Store
Finally, initialize the Object Storage location as a Kloset Store:
plakar at "ovhcloud-s3-backups" create
Since you already configured the passphrase when adding the store, this will use that passphrase automatically to encrypt all data before sending it to Object Storage.
Once this step completes, your backup server is fully connected to OVHcloud Object Storage and ready to receive encrypted, deduplicated snapshots.
Step 5: Set Up SSH Access to Source Servers
To back up remote servers, Plakar needs secure access to read their files. SSH key-based authentication is the standard approach because it’s more secure than passwords and allows automated backups without interactive prompts. You’ll configure the backup VPS to connect to your source servers using SSH keys.
Install the SFTP integration
First, install the SFTP integration which enables SSH-based backups:
plakar pkg add sftp
Generate SSH keys
Generate an SSH key pair on your backup VPS:
ssh-keygen -t ed25519 -f ~/.ssh/id_ed25519_plakar -C "plakar@backup"
Press Enter to use no passphrase (recommended for automated backups).
Copy the public key to source servers
Copy the public key to each server you want to back up:
ssh-copy-id -i ~/.ssh/id_ed25519_plakar.pub user@source-server-1
ssh-copy-id -i ~/.ssh/id_ed25519_plakar.pub user@source-server-2
Replace user with the appropriate username on your source servers.
Test SSH access:
ssh -i ~/.ssh/id_ed25519_plakar user@source-server-1 'echo "Connection successful"'
Create SSH host aliases (recommended)
SSH config aliases simplify commands and centralize connection settings. Instead of typing full hostnames, ports, and key paths every time, you can use short aliases. This makes Plakar commands cleaner and reduces the chance of errors.
Create a host alias in ~/.ssh/config to simplify Plakar commands:
cat >> ~/.ssh/config << 'EOF'
Host source-1
    HostName source-server-1.example.com
    User backupuser
    Port 22
    IdentityFile ~/.ssh/id_ed25519_plakar

Host source-2
    HostName source-server-2.example.com
    User backupuser
    Port 22
    IdentityFile ~/.ssh/id_ed25519_plakar
EOF
Test the alias:
ssh source-1 'echo "Alias works"'
Step 6: Configure Backup Sources
Source connectors define what to back up—which servers and which directories. Like storage connectors, sources are configured once and referenced by name. This approach provides several benefits: you can reuse source definitions across multiple backup commands, change paths centrally without updating scripts, and maintain a clear inventory of what’s being backed up.
Add source connectors
Configure a source for each server you want to back up:
# Add first source server
plakar source add web-server-1 sftp://source-1:/var/www

# Add second source server
plakar source add web-server-2 sftp://source-2:/var/www
You can add multiple sources pointing to different directories on the same server or different servers.
Verify source configuration
List your configured sources:
plakar source show
Step 7: Run Your First Backup
Before setting up automated backups, it’s important to test your configuration manually. This ensures all connections work, credentials are correct. A successful manual backup confirms your entire setup is working.
Test your backup configuration by running a manual backup.
Back up a single source
plakar at "@ovhcloud-s3-backups" backup "@web-server-1"
You should see progress as Plakar connects to the source server, reads files, deduplicates, encrypts, and uploads to OVHcloud Object Storage.
Back up multiple sources
plakar at "@ovhcloud-s3-backups" backup "@web-server-1" "@web-server-2"
Verify the backup
List snapshots in your Kloset Store:
plakar at "@ovhcloud-s3-backups" ls
You should see your snapshot(s) listed with timestamps and snapshot id.
Step 8: Schedule Automatic Backups
Manual backups work for testing, but production backup systems must run automatically. Plakar includes a built-in scheduler that manages backup timing and can verify backups after creation. Using Plakar’s scheduler (rather than cron directly) provides better integration, easier management, and built-in checking capabilities.
Plakar includes a built-in scheduler that can run backups automatically. You’ll create a configuration file that defines what to back up and how often.
Create the scheduler configuration
Create a file called scheduler.yaml in your home directory:
cat > ~/scheduler.yaml << 'EOF'
agent:
  tasks:
    - name: Backup web-server-1
      repository: "@ovhcloud-s3-backups"
      backup:
        path: "@web-server-1"
        interval: 24h
        check: true

    - name: Backup web-server-2
      repository: "@ovhcloud-s3-backups"
      backup:
        path: "@web-server-2"
        interval: 24h
        check: true
EOF
This configuration:
- Defines two backup tasks (one for each source)
- Runs each backup every 24 hours (
interval: 24h) - Verifies each backup after creation (
check: true)
Plakar Scheduler
The scheduler is still basic and will be improved in future versions with additional features and capabilities.
Start the scheduler
Start the Plakar scheduler:
plakar scheduler start -tasks ~/scheduler.yaml
The scheduler runs in the background and will execute backups according to the intervals you configured.
You can check Scheduler Docs for more information on scheduling options.
Step 9: Set Up Systemd Services
Right now, both the Plakar scheduler and UI are running in your current session. If your VPS reboots or your SSH session ends, these processes will stop and backups won’t run automatically. To ensure continuous operation, you need to configure them as system services that start automatically when your VPS boots.
Systemd is the standard service manager on modern Linux systems. By creating systemd service files, you ensure that Plakar processes start on boot, restart if they crash, and can be managed using standard tools like systemctl. While Plakar will likely include built-in service installation scripts in future versions, currently you need to create these service files manually.
Configure both the Plakar scheduler and UI to run automatically on your backup VPS.
Create the scheduler service
The scheduler needs to run continuously to execute backups on schedule. Creating a systemd service ensures it starts automatically when your VPS boots and restarts if it crashes.
Create a systemd service file to run the Plakar scheduler automatically at boot:
cat << 'EOF' | sudo tee /etc/systemd/system/plakar-scheduler.service > /dev/null
[Unit]
Description=Plakar Scheduler
After=network.target

[Service]
Type=forking
ExecStart=/usr/bin/plakar scheduler start -tasks /home/ubuntu/scheduler.yaml
ExecStop=/usr/bin/plakar scheduler stop
Restart=on-failure
User=ubuntu
WorkingDirectory=/home/ubuntu

[Install]
WantedBy=multi-user.target
EOF
Create the UI service
The web UI also needs to run continuously so you can monitor your backups at any time, not just when you’re logged into SSH.
Create a systemd service for the Plakar web UI:
cat << 'EOF' | sudo tee /etc/systemd/system/plakar-ui.service > /dev/null
[Unit]
Description=Plakar Web UI
After=network.target

[Service]
Type=simple
ExecStart=/usr/bin/plakar at "@ovhcloud-s3-backups" ui -listen :8080
Restart=always
User=ubuntu
WorkingDirectory=/home/ubuntu

[Install]
WantedBy=multi-user.target
EOF
Replace ubuntu with your actual username if different in both service files.
Plakar Installation
If Plakar is installed in a different location, update the path accordingly. Use which plakar to find the correct path.
Enable and start both services
sudo systemctl daemon-reload
sudo systemctl enable plakar-scheduler
sudo systemctl enable plakar-ui
sudo systemctl start plakar-scheduler
sudo systemctl start plakar-ui
Check both services are running:
sudo systemctl status plakar-scheduler
sudo systemctl status plakar-ui
Access the UI
The Plakar UI requires an access token for security. You can set a custom token using an environment variable, or Plakar will generate one automatically.
Option 1: Set a custom token (recommended)
Set the PLAKAR_UI_TOKEN environment variable before starting the UI service. Update your systemd service file:
cat << 'EOF' | sudo tee /etc/systemd/system/plakar-ui.service > /dev/null
[Unit]
Description=Plakar Web UI
After=network.target

[Service]
Type=simple
Environment="PLAKAR_UI_TOKEN=your-secure-token-here"
ExecStart=/usr/bin/plakar at "@ovhcloud-s3-backups" ui -listen :8080
Restart=always
User=ubuntu
WorkingDirectory=/home/ubuntu

[Install]
WantedBy=multi-user.target
EOF
Replace your-secure-token-here with a secure token of your choice (e.g., a UUID or strong random string).
Then reload and restart the service:
sudo systemctl daemon-reload
sudo systemctl restart plakar-ui
Open your browser and navigate to http://your-vps-ip:8080?plakar_token=your-secure-token-here.
Option 2: Use auto-generated token
If you don’t set PLAKAR_UI_TOKEN, Plakar generates a random token automatically. You can retrieve it from the logs:
sudo journalctl -u plakar-ui -n 100 --no-pager | grep -i token
Look for a line like:
launching webUI at http://:8080?plakar_token=d9fccdbd-77a3-41a0-8657-24d77a6d00ac
Copy the token from the URL and open your browser to http://your-vps-ip:8080. If prompted for a token, paste the token value.
 Security Note
For production use, configure a firewall to restrict access to port 8080 to only your IP addresses, or set up a reverse proxy with SSL.
Troubleshooting
- Authentication errors: Verify SSH keys are properly configured and the user has read permissions on source servers
- Can’t connect to Object Storage: Check your S3 credentials and endpoint URL are correct. Verify the passphrase is configured with
plakar store show ovhcloud-s3-backups - Permission denied on source servers: Ensure the SSH user has read access to the directories you’re backing up
- Services won’t start after reboot: Check service status with
systemctl statusand view logs withjournalctl -u plakar-schedulerorjournalctl -u plakar-ui
You can also run the UI locally on your own computer by installing Plakar and configuring the same store with your OVHcloud S3 credentials. This allows you to access backups without connecting to the VPS.
Found a bug or mistake in the documentation? Create an issue on GitHub