Proxmox VE Installation
Plakar Control Plane can be deployed on Proxmox VE by creating a virtual machine manually and booting it from the Plakar Control Plane ISO image. The official ISO image can be downloaded from the Plakar Control Plane Downloads Page.
Uploading the ISO
Before creating the virtual machine, the ISO needs to be added to a storage location on your Proxmox node so it can be attached as installation media.
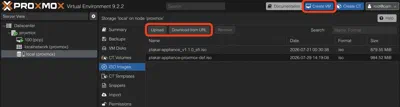
In the Proxmox web interface, select the storage you want to hold the ISO from the left-hand tree, then open its ISO Images section. From here you can either upload the file directly from your computer, or provide a publicly accessible URL and have Proxmox download it for you. Either way, you can optionally supply a checksum and select the hashing algorithm used, so Proxmox verifies the file’s integrity once it’s added.
Note
Prefer a shared storage location if your Proxmox node is part of a cluster. An ISO or disk kept on node-local storage won’t be reachable if the virtual machine ever needs to run on a different node.
Creating the Virtual Machine
Click Create VM in the top-right of the Proxmox interface to open the creation wizard.
General
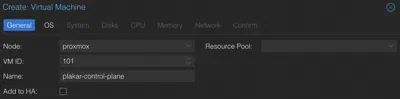
Give the virtual machine a name. The VM ID can be left at its pre-assigned value unless you need a specific one for your environment.
OS
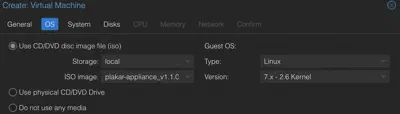
Set Use CD/DVD disc image file (iso), choose the storage where you uploaded the ISO, and select the Plakar Control Plane image from the list. For Guest OS, set the type to Linux and the version to 7.x - 2.6 Kernel.
System
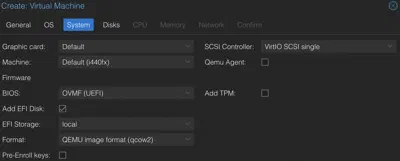
Set BIOS to OVMF (UEFI) and check Add EFI Disk, selecting any storage available to hold it. Leave the EFI disk format on the default (qcow2).
Warning
Leave Pre-Enroll keys unchecked. This option enrolls Microsoft’s default Secure Boot keys, and the appliance will fail to boot if it’s enabled.
Everything else on this tab can be left at its default.
Disks
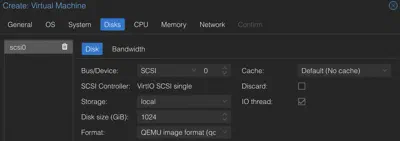
Set the disk size to 1 TB. This is the recommended size for a production deployment. The disk stores the database, logs, and all Plakar state, separate from wherever you configure backups themselves to be stored. For evaluation or testing, a smaller disk is fine. Leave the format (qcow2) and storage selection on default, or pick a specific storage if your node has more than one available.
CPU
Set Cores to 4 and Sockets to 1. This is the recommended sizing
for production use. Leave Type on its default (x86-64-v2-AES). For
evaluation or testing, a smaller number of cores is fine.

Memory
Set memory to 16384 MiB (16 GB), the recommended amount for production use. For evaluation or testing, a smaller memory size is fine.

Network
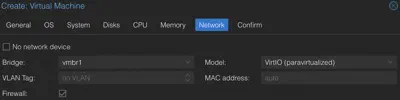
Select the network bridge the appliance should attach to. Leave the model on VirtIO.
Note
By default the appliance receives its network configuration via DHCP, so a DHCP server must be running and reachable on the selected bridge. For a static IP instead, see the Advanced tab in Configuring the Appliance below.
Confirm
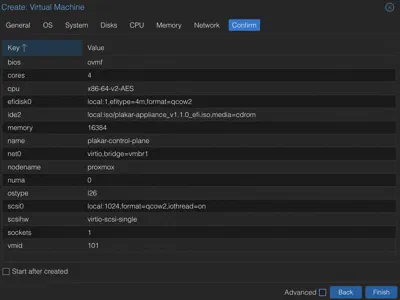
Review the summary of your selections, then click Finish to create the virtual machine.
Configuring the Appliance
By default the appliance boots with DHCP networking and no SSH access. If that’s enough for you, skip ahead to Start the appliance and complete enrollment. Otherwise, pick one of the two tabs below, not both. A Proxmox VM only takes a single cloud-init user-data source, so if you use the Advanced tab’s snippet, set the SSH key there too, alongside any proxy, registry, or network settings, instead of from the UI.
If SSH access is all you need (no proxy, no registry mirror, no static IP), set the key from the Proxmox UI, no YAML required.
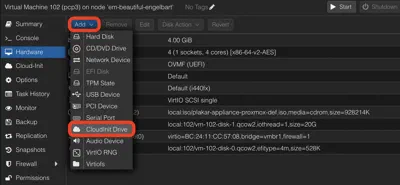
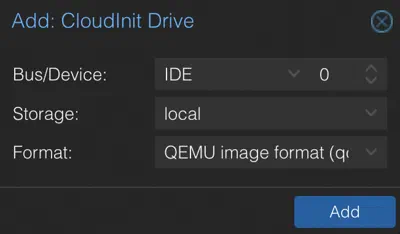
- On the VM, go to Hardware, click Add, and select CloudInit Drive.
- Set Bus/Device to IDE, and change the index from the default
0to3, so the drive lands onide3. - Choose a Storage location.
- Leave Format on the default (QEMU image format, qcow2).
- Click Add.
-
Open the Cloud-Init tab, click SSH public key, and paste in your public key, or upload the key file directly.
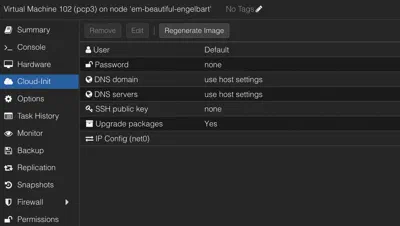
The Proxmox UI can only set an SSH key: it has no fields for a proxy, registry mirror, or static IP. For any of those, write a single cloud-init YAML snippet on the Proxmox node instead; it can carry all four settings at once, so include only the keys you actually need.
What needs to be reachable
Plakar Control Plane needs HTTPS access to api.plakar.io for runtime
configuration, license validation, and plugin downloads. If your proxy uses a
whitelist rather than allowing all traffic, *.plakar.io must be on it.
The appliance also needs to pull Docker images from docker.io and ghcr.io.
There are two supported approaches:
- Route image pulls through the same HTTP proxy. If you take this route,
the proxy must allow:
*.docker.io*.docker.com*.ghcr.io*.githubusercontent.com
- Configure a Harbor registry mirror. This is the preferred option for production, since it gives you a local cache of the images instead of pulling them over the internet on every deployment. If you use Harbor, you don’t need to whitelist the domains above on your proxy.
Write the user-data snippet
mkdir -p /var/lib/vz/snippets
cat > /var/lib/vz/snippets/plakar-appliance.yaml << 'EOF'
#cloud-config
proxy:
  http:  http://<proxy-ip>:<proxy-port>
  https: http://<proxy-ip>:<proxy-port>
  no_proxy: .corp.example,10.0.0.0/8       # optional

registry:
  mirrors:
    docker.io: <harbor-host>/dockerhub-proxy
    ghcr.io:   <harbor-host>/ghcr-proxy
  insecure: false     # true: skip TLS verification for the mirror hosts

network:
  ethernets:
    eth0:
      addresses: [10.0.1.5/24]             # CIDR suffix is mandatory
      gateway4: 10.0.1.1
      nameservers:
        addresses: [10.0.1.53, 10.0.1.54]

ssh_authorized_keys:
  - ssh-ed25519 AAAA...
EOF
Every top-level key above is optional; include only what you need. On Proxmox,
this network: key is the only network source ahead of the DHCP fallback:
whichever NICs it doesn’t configure fall back to DHCP.
network: accepts a subset of netplan v2
syntax, either under a top-level network: key (as above) or a bare
ethernets: key. The supported fields are addresses (first entry, CIDR
required), gateway4, routes ({to, via}, with to: default as an alias for
gateway4), nameservers.addresses, dhcp4: true, and match.macaddress. Use
match.macaddress to select a NIC by MAC address instead of its kernel name
(eth0, eth1, … in PCI order, for multi-NIC VMs). A MAC match survives
adapter reordering. Anything else netplan defines, such as bonds, VLANs,
bridges, dhcp6, or mtu, is silently ignored.
- One default gateway, one DNS set. Declare
gateway4(or a default route) andnameserverson exactly one interface — the management one. If several interfaces declare either, the first by interface name wins and the others are logged and ignored. - Unlisted NICs fall back to DHCP. Any NIC without a stanza, or with a stanza that fails validation, is picked up by the DHCP client. A NIC on a segment without a DHCP server simply stays unconfigured.
- The first NIC (
eth0) is special: when it is DHCP-configured, boot waits for its lease. Leases on other NICs are acquired in the background and never delay boot. - Static addressing is outbound-only: the appliance’s own services (UI, SSH) listen on all interfaces regardless of this configuration. Restrict access to the management plane with your network policy.
Note
Proxmox’s own IP configuration fields on the Cloud-Init tab (ipconfig0 and
friends) are not read by the appliance — they land in a separate
network-config file the appliance does not consume. Static addressing must
go through the network: key above instead.
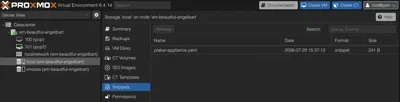
The Proxmox web interface only lists existing snippets under Storage →
Snippets it has no option to create or upload one. Snippets have to be placed
directly on disk, e.g. via the node’s shell. On the default local storage,
that path is /var/lib/vz/snippets/.
Attach the user-data to the VM
Add a cloud-init drive so Proxmox can generate the cidata image, and point it at
your snippet. The cloud-init drive must always be attached at ide3:
qm set <vmid> --ide3 local:cloudinit
qm set <vmid> --cicustom "user=local:snippets/plakar-appliance.yaml"
qm cloudinit update <vmid>
Apply and reboot
qm reboot <vmid>Verify
Watch the console during boot for lines prefixed proxy-collect: (proxy and
registry) and net-collect: / net-apply: (network). Each reports the
configuration that was applied, or why none was found:
proxy-collect: proxy configured: http=http://<proxy-ip>:<proxy-port> https=... no_proxy=...Configuration is collected once per boot. Changes to the snippet take effect on the next reboot.
Start the appliance and complete enrollment
Power on the virtual machine. Once the appliance has booted and is reachable on the network, open it from a browser using its assigned IP address.
http://<ASSIGNED-IP>
Note
If the appliance is on a private or NAT’d bridge that isn’t directly reachable from your browser, you can forward a port on the Proxmox host’s public interface to the appliance instead:
iptables -t nat -A PREROUTING -i <public-bridge> -p tcp --dport <public-port> -j DNAT --to-destination <appliance-ip>:80
iptables -t nat -A POSTROUTING -o <private-bridge> -p tcp -d <appliance-ip> --dport 80 -j MASQUERADE
Then browse to http://<proxmox-host-public-ip>:<public-port>.
For production environments, restrict access to trusted IP ranges, private networking, a VPN, or a reverse proxy or load balancer with TLS.
For first-time installations, you will be guided through the enrollment process to:
- Register the instance with Plakar services for licensing and billing
- Create the initial administrator account
See the enrollment documentation for more details.