OVHcloud Compute
OVHcloud Compute resources represent OVHcloud Public Cloud instances. Plakar Control Plane backs up an instance by snapshotting its boot disk and any attached Cinder volumes as temporary Glance images, then streams the image data directly into the Kloset store and recreates the instance during a restore.
Inventory Management
Managed inventories can discover OVHcloud Compute instances automatically once connected to your OVHcloud Public Cloud project. OVHcloud Compute resources are only discovered by the OVHcloud inventory and cannot be setup by a self-managed inventory.
Backup flow
flowchart TD
  subgraph OVHcloud["OVHcloud Public Cloud Project"]
    Instance["Compute Instance"]
    Volumes["Attached Cinder Volumes"]
    Glance["Temporary Glance Images"]
  end
  subgraph Plakar["Plakar Control Plane"]
    Source["OVHcloud Compute
Source app"]
    Backup["Backup process
Encrypt & deduplicate"]
  end
  Store["Kloset Store"]
  Source -->|"Nova: snapshot boot disk"| Instance
  Source -->|"Cinder: export volume
 to image"| Volumes
  Instance --> Glance
  Volumes --> Glance
  Glance -->|"download image data"| Source
  Source --> Backup
  Backup --> Store
Restore flow
flowchart TD
  Store["Kloset Store"]
  subgraph Plakar["Plakar Control Plane"]
    Destination["OVHcloud Compute
Destination app"]
    Restore["Restore process"]
  end
  subgraph OVHcloud["OVHcloud Public Cloud Project"]
    Glance["Glance Images"]
    NewInstance["New Compute Instance"]
    NewVolumes["New Cinder Volumes"]
  end
  Store --> Restore
  Destination --> Restore
  Restore -->|"uploads QCOW2 disk data"| Glance
  Glance -->|"Nova: create instance
 from boot image"| NewInstance
  Glance -->|"Cinder: create volume
 from image"| NewVolumes
  NewVolumes -->|"attach"| NewInstance
Shared Configuration
The following settings are available when configuring both source and destination apps.
Note
Currently the integration discovers several values for endpoints. You can select the compute instance UUID as the specific endpoint value incase you get configuration errors from the endpoint being ambiguous.
- OpenStack Application Credential Id: Required. Identifies the OpenStack application credential used to authenticate with your OVHcloud Public Cloud project.
- OpenStack Application Credential Secret: Required. The secret paired with the application credential Id.
- OpenStack Region: The OpenStack region hosting the project, for example
GRA11orSBG5.
Destination Configuration
The following extra setting is available when configuring a destination app.
- Recovery Network Mode: Controls how the restored instance’s network
interfaces are set up.
Preservereattaches the network interfaces the instance originally had, matching them by network ID. When restoring to a different region, for example through a spawner entry, the original network IDs no longer exist in the target region, soPreserveinstead matches networks by name.Removeboots the instance without a network attached instead of falling back to a default network.
Getting OpenStack Credentials from OVHcloud
Plakar Control Plane authenticates against OVHcloud Compute through an OpenStack application credential rather than your OVHcloud account credentials. Application credentials are scoped to a single project and can be restricted to only the roles Plakar Control Plane needs, so the integration never has broader access than backup and restore requires.
Create a Dedicated User for PCP
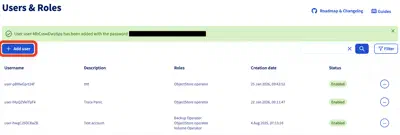
Application credentials are issued to an OpenStack user, so start by creating a user dedicated to Plakar Control Plane. In the OVHcloud Control Panel, go to Public Cloud > Settings > Users & Roles and create a new user. Assign it the following roles, which cover snapshotting instances, exporting volumes to images, and recreating instances and volumes during a restore:
Compute OperatorImage OperatorVolume Operator
OVHcloud generates a username and password for this user. These credentials are later used to sign in and generate an application credential.
Generate an Application Credential
Application credentials are managed through the OpenStack Horizon dashboard rather than the OVHcloud Control Panel. Sign in to https://horizon.cloud.ovh.net using the username and password generated for the dedicated user, then go to Identity > Application Credentials and create a new one.

Provide a name, an optional description, and an expiration date and time for the credential. Expiration limits how long the credential remains valid.
Warning
Keep track of the credential’s expiration date and update the configuration in Plakar Control Plane before it expires. Once an application credential expires, Plakar Control Plane can no longer authenticate with OVHcloud and won’t be able to run any workflow against your resources such as backups.
Once created, the application credential’s ID and Secret are displayed.
These are the values used as the OpenStack Application Credential Id and
OpenStack Application Credential Secret when configuring the OVHcloud
Compute app in Plakar Control Plane. You can also download an openrc file or a
clouds.yaml file containing the same credential.
Warning
The secret is only ever shown at creation time. If you close the dialog without copying it, it cannot be retrieved again and a new application credential must be generated.