OVHcloud Bare Metal Installation
Plakar Control Plane can be deployed on an OVHcloud dedicated server using the
official QCOW2 image. The image can be downloaded from the
Downloads Page.
Dedicated servers are available in the OVHcloud Control Panel under Bare Metal Cloud -> Dedicated Servers.
Ordering a Dedicated Server
Plakar Control Plane requires the following recommended setup:
- A minimum of 4 vCPUs
- At least 16 GB RAM
- A first disk of around 10 GB for the OS
- A second disk of at least 1 TB for Control Plane data
These are recommendations for a production deployment. For evaluation or testing, you can reduce CPU, RAM, and storage. The data volume stores the database, logs, and all Plakar state. Backups themselves are stored wherever you configure using apps.
Note
Dedicated servers on OVHcloud are preconfigured hardware offers, so you cannot always select an exact combination of CPU, RAM, and disk sizes. Choose the closest available offer to the recommended specifications above.
Installing the Appliance
The Plakar Control Plane appliance is distributed as a QCOW2 image. OVHcloud
allows custom images to be installed through its custom OS flow. After ordering
a dedicated server, the following setup is required.
OS Setup
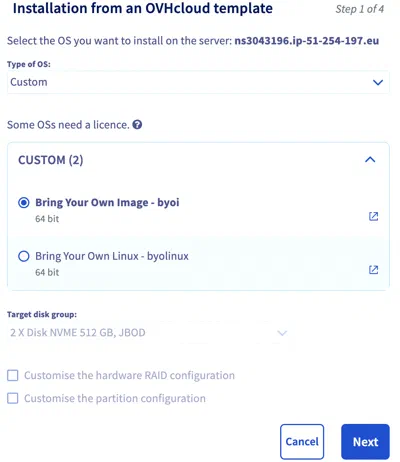
Set Type of OS to Custom, then select Bring your own image.
Appliance Image
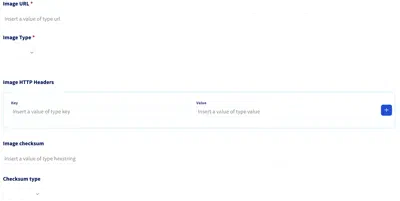
Provide a publicly accessible URL for the Plakar Control Plane QCOW2 image in
Image URL. You can use the download link from the
Downloads Page, or host the image yourself on publicly accessible
storage such as an S3 bucket. and set the Image Type to qcow2.
You can optionally provide a checksum to verify the image during installation.
We publish both SHA-256 and MD5 checksums on the Downloads Page. If you
provide a checksum, enter it in Image checksum and select the corresponding
checksum type.
SSH Public Key
Leave SSH Public Key blank. OVHcloud’s SSH key configuration is not read by the appliance.
If you need SSH access, provide your public key through Config Drive
UserData. The appliance uses the plakar user for SSH access.
Config Drive UserData
Config Drive UserData contains the cloud-init configuration used by the appliance. It can be used to configure SSH access, an HTTP proxy, or a Harbor registry mirror.
See Configuring the Appliance for more information.

EFI Bootloader
The appliance boots through UEFI. Set Path of the EFI bootloader from the OS
installed on the server to:
\EFI\BOOT\BOOTX64.EFI
Configuring the Appliance
Config Drive UserData is the cloud-init configuration passed to the appliance during installation. At minimum, it can contain an SSH public key. Proxy and registry mirror settings can be added when required by your environment.
What needs to be reachable
Plakar Control Plane requires HTTPS access to api.plakar.io for runtime
configuration, license validation, and plugin downloads. If your proxy uses a
whitelist instead of allowing all outbound traffic, add *.plakar.io to it.
The appliance also needs to pull container images from docker.io and
ghcr.io. There are two supported approaches:
-
Route image pulls through the HTTP proxy. If you choose this option, the proxy should allow access to:
*.docker.io*.docker.com*.ghcr.io*.githubusercontent.com
-
Use a Harbor registry mirror. This is the recommended approach for production deployments because images are pulled from a local registry cache instead of the public internet. When using Harbor, you don’t need to whitelist the Docker and GitHub domains above on your proxy.
UserData Example
The following example configures an SSH key, an HTTP proxy, and Harbor registry mirrors:
#cloud-config
ssh_authorized_keys:
  - ssh-ed25519 AAAA...

proxy:
  http: http://<proxy-ip>:<proxy-port>
  https: http://<proxy-ip>:<proxy-port>
  no_proxy: .corp.example,10.0.0.0/8 # optional

registry:
  mirrors:
    docker.io: <harbor-host>/dockerhub-proxy
    ghcr.io: <harbor-host>/ghcr-proxy
  insecure: false # true: skip TLS verification for the mirror hosts
Every top-level key above is optional. Include only the configuration required by your environment.
Network Configuration
By default, the appliance uses DHCP to obtain its network configuration. If the
OVHcloud server requires a static IP address, multiple network interfaces, or
custom routes, you can configure them using the network key in UserData.
For example:
#cloud-config
network:
  ethernets:
    eth0:
      addresses: [10.0.1.5/24]
      gateway4: 10.0.1.1
      nameservers:
        addresses: [10.0.1.53, 10.0.1.54]
Connect over SSH
If you configured an SSH public key, connect to the appliance using the plakar
user:
ssh plakar@<server-ip-address>Replace <server-ip-address> with the public IP address assigned to the
dedicated server.
Start the Appliance and Complete Enrollment
Once the installation settings are configured, confirm the order to start the installation.
Note
The first boot may take some time while the appliance completes its initial setup.
Once the appliance has booted and the initial setup is complete, open Plakar Control Plane from a browser using the server’s public IP address:
http://<server-ip-address>For a new installation, you will be guided through the enrollment process to:
- Register the instance with Plakar services for licensing and billing
- Create the initial administrator account
See the enrollment documentation for more information.