Updating vSphere Installation for Plakar Control Plane
Plakar Control Plane can be deployed on vSphere from either an OVA appliance or a manually-built VM booted from the Plakar Control Plane ISO. Most Plakar Control Plane updates can be installed directly from the settings page without touching the VM. However, in some cases, the underlying appliance needs to be updated. The update procedure depends on how the VM was deployed.
Deployment layout
On the ISO path, the appliance image is immutable and runs entirely in RAM. Persistent Plakar Control Plane data and configuration are stored on the VM’s data disk. Updating the appliance only requires replacing the ISO and restarting the existing VM. The persistent data disk remains unchanged.
On the OVA path, the appliance is installed on the VM’s boot disk. Persistent Plakar Control Plane data and configuration are stored on a separate data disk. Updating the appliance requires deploying a new OVA and attaching the existing data disk to the new VM.
Updating the appliance
Deploy the new OVA
Download the newer Plakar Control Plane appliance OVA from the downloads page and deploy it as a new VM, following Creating the Virtual Machine in the vSphere installation guide. Do not power on the new VM yet.
Power off the VMs
Power off the existing appliance VM and, if it was powered on during deployment, the new VM as well. A disk cannot be detached from or attached to a running VM.
Delete snapshots from the old VM
On the existing VM, open the Snapshots tab and check whether any snapshots exist. If there are, open Manage Snapshots and select Delete All.
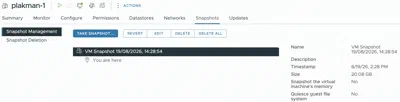
Deleting Snapshots
Deleting a snapshot removes the ability to revert the VM to that point in time. Make sure the snapshots are no longer needed before deleting them.
Detach the data disk from the old VM
On the existing VM, open Actions > Edit Settings and locate the data disk under Virtual Hardware. Note the disk’s Disk File path. You will use it to identify the disk when attaching it to the new VM.
Click the ellipsis at the right of the disk row and select Remove device. Click OK to apply the change.
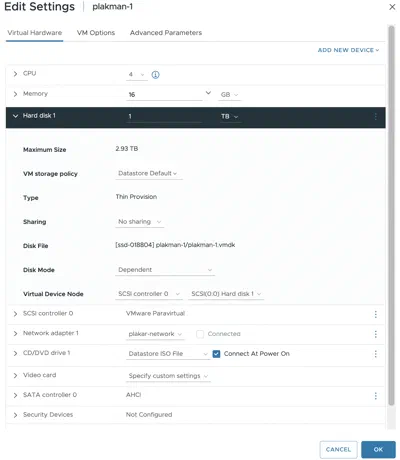
Detaching the Data Disk
Do not select the option that removes the device and deletes its files from the datastore. That option deletes the data disk and its contents.
Attach the data disk to the new VM
On the new VM, open Edit Settings and select Add New Device → Existing Hard Disk. Browse to the disk file noted in the previous step and click OK.
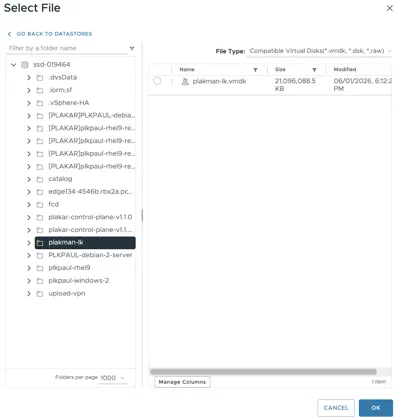
Power on the new VM
Power on the new VM.
The appliance will boot using the existing data disk. Inventories, schedules, policies, configuration, and other Plakar Control Plane data will remain intact.
Verify
Once the VM is reachable on the network, open Plakar Control Plane in a browser and confirm that the appliance is running the new version and that existing data is present.
Once confirmed, the old VM and its remaining boot disk can be removed.
Upload the new ISO
Download the newer Plakar Control Plane appliance ISO from the downloads page and upload it to the datastore currently holding the ISO used by the VM.
Refer to Upload the ISO to a datastore in the vSphere installation guide for details.
Power off the VM
Right-click the VM in Hosts and Clusters and select Power > Power Off.
Remove the existing CD/DVD drive
Right-click the VM and select Edit Settings. Locate the CD/DVD Drive under Virtual Hardware and click the ellipsis at the right of the device row.
Select Remove device, then click OK to apply the change.
Add a new CD/DVD drive
Open Edit Settings again and select Add New Device > CD/DVD Drive. Select Datastore ISO File as the source, then click Browse and select the newly uploaded Plakar Control Plane ISO.
Enable Connect At Power On, then click OK.
Note
Removing and adding the CD/DVD drive only changes the appliance media. The VM’s data disk and other configured devices remain unchanged.
Power on the VM
Right-click the VM and select Power → Power On.
The appliance will boot from the new ISO and uses the existing data disk. Inventories, schedules, policies, configuration, and other Plakar Control Plane data will remain intact.
Verify
Once the VM is reachable on the network, open Plakar Control Plane in a browser and confirm that the appliance is running the new version and that existing data is present.